Have you ever had trouble accessing a file on the Network Drive, and suddenly you get a “Location is not available” error message or the system feels slow? These are common signs of timeout issues on the Network Drive in Windows, where the connection to the network drive takes too long before it finally fails.
This problem not only interferes with work comfort but can also significantly impact productivity. Imagine if you lost 10-15 minutes each time you had to wait and try to reconnect.
For teams working with files on a shared drive, timeout issues can be a serious hindrance to collaboration. A disconnected file transfer can corrupt data, while slow access hinders the work process. In a professional environment, every minute lost means a decrease in efficiency.
Fortunately, this issue can be addressed with some technical adjustments. Bardimin will provide step-by-step guidance to reduce Network Drive timeouts, restore connection stability, and maintain your work productivity.
Common Causes of Network Drive Timeouts
Timeouts at Network Drive can occur due to several factors that affect the connection and system settings. Here are some of the causes that often appear:
Unstable Network Connection
One of the main causes of timeouts is an unstable network connection. If the network signal is weak or frequently disconnected, access to the network drive will be interrupted. This can be caused by a variety of things, such as interference from other devices, being too far away from the router, or problems with your internet service provider (ISP). The quality of the network cable used also affects the stability of the connection.
Imoptimal System Settings
Improper system settings can result in difficulty accessing the Network Drive. For example, incorrect proxy settings or overly tight firewall configurations can block the connection to the network drive.
In addition, outdated or poorly installed network adapter drivers can also cause this problem. Making sure all system settings are optimized is an important step to prevent timeouts.
External Factors such as Hardware and Software
Hardware issues, such as damage to routers or switches, can also cause timeouts at the Network Drive. Additionally, incompatible software or bugs in applications used to access network drives can cause a delay in response. It is important to check all the hardware and software involved in the connection process to ensure that everything is working properly.
How to Reduce Timeout Time on Network Drive – Full Explanation
A. Repairing Network Connection
Unstable network connections are often the main cause of timeouts at the Network Drive. Therefore, it is important to check and repair the network to keep the connection optimal.
Steps to Check and Repair Network Connection:
1. Basic Connection Test
The ping -t command tests the stability of the layer 3 (IP) connection. The -t parameter allows continuous ping until it is stopped manually.
Reply from 192.168.1.50: bytes=32 time=2ms TTL=64  <= Optimal connection
Reply from 192.168.1.50: bytes=32 time=152ms TTL=64  <= High latency
The request timed out. <= Packet lossInterpretation:
- Time <50ms: Ideal
- Time 50-100ms: Tolerable
- Time >100ms: Problematic
- Packet loss >2%: Critical
2. Use Advanced Diagnostic Tools
Pathping combines traceroute and statistical ping functions for 25 seconds per hop.
pathping 192.168.1.1003. SMB Port Verification
Windows uses port 445 for the SMB (Server Message Block) protocol version 2/3.
telnet 192.168.1.100 445- Has the connection failed? Firewall blocking
- Timeout? SMB service not running
B. Changing Registry Settings for Network Drive Optimization
In addition to improving the network, optimizing the Windows Registry settings can help reduce timeouts at the Network Drive. The registry stores various system configurations, including connection parameters to the network drive.
Before changing the Registry, make sure to create a backup first so that it can be restored in case something goes wrong.
Step-by-Step Guide to Change Registry Settings in Windows:
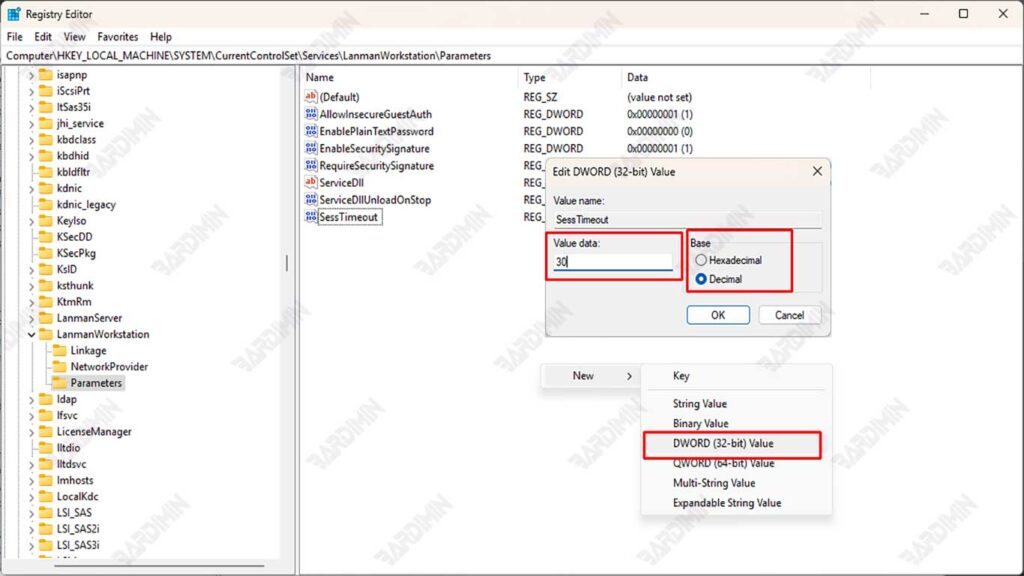
1. Open the Registry Editor
To open the Registry Editor, press the Win + R button, then type regedit and press Enter. After that, click Yes on the UAC window that appears.
2. Navigate to the Relevant Key
Enter the following path in the address bar of the Registry Editor:
Computer\HKEY_LOCAL_MACHINE\SYSTEM\CurrentControlSet\Services\LanmanWorkstation\ParametersNote: If the Parameters folder doesn’t exist, right-click on the LanmanWorkstation → New > Key and name it Parameters.
3. Create/Modify DWORD Values
Look for the SessTimeout entry in the right-hand window. If there is none, create a new value by:
- Right-click the empty area, then select New > DWORD (32-bit) Value.
- Name: SessionTimeout
- Double-click on the SessTimeout, then change the Value data to 30
- Recommendation: 30 (seconds) for stable environments, 45 for complex networks.
- Windows default: 60 (seconds).
- On Base, select Decimal and click OK.
4. Add Supporting Parameters (Optional)
As supporting parameters, you can also add KeepConn and DormantFileLimit values. If there isn’t, you can create it as in step 3.
KeepConn:
- Function: Maintain idle connection.
- Value: 10 (number of connections).
DormantFileLimit:
- Function: Limit the files that can be idle.
- Value: 1024 (decimal).
5. Restart Service & System
Reboot the computer to make sure the changes occur.
Not Recommended Values
| Parameters | Minimum Grade | Maximum | Effects If Wrong |
| SessionTimeout | 15 | 120 | Timeout is too fast/slow |
| KeepConn | 5 | 50 | High server load |
| DormantFileLimit | 256 | 4096 | Memory overload |
Monitoring and Testing Changes
After making changes to reduce timeout time on the Network Drive, it is important to monitor performance and test the stability of the connection. Here’s how to do it, as well as the tools you can use:
How to Monitor Network Drive Performance After Making Changes
1. Use of Network Monitoring Tools
Using a network monitoring tool can help you monitor the performance of the Network Drive in real time. The tool can provide information about connection status, latency, and throughput required to evaluate whether the changes made have been successful.
2. Record Performance Before and After Change
It’s important to note performance metrics before and after making changes. By comparing this data, you can determine whether there is an increase in access speed or a reduction in timeout time.
3. Using System Logs
Checking the system logs in Windows can provide insight into errors or issues that occur while accessing the Network Drive. You can use the Event Viewer to view logs related to your network connection.
Tools That Can Be Used to Test Connection Speed and Stability
1. Fluke LAN Tester
The Fluke LAN Tester is an excellent diagnostic tool for identifying network issues and ensuring optimal performance. It can measure transmission speeds and packet delivery rates, as well as detect issues such as damage to cables or connectors that are not connected properly.
2. LAN Speed Test
LAN Speed Test is a simple yet powerful utility for measuring the speed of file transfer between two computers on a local network. This tool allows you to test your network speed by selecting a shared folder on the network and providing clear results regarding connection performance.
3. TamoSoft Throughput Test
TamoSoft Throughput Test is a utility that allows testing network performance on both wireless and wired connections. The tool sends TCP and UDP data streams continuously and calculates important metrics such as upstream and downstream throughput, packet loss, and return travel time.
4. SolarWinds Network Performance Monitor
SolarWinds NPM is a comprehensive network monitoring tool, offering holistic monitoring of the entire network with an easy-to-use dashboard. This tool can help detect high latency issues and provide an in-depth analysis of network performance.