Sepia toning is a technique used to give a vintage or old-fashioned look to photos. This effect is often used to create a nostalgic feel, as if the photo is from the past. The color sepia, which is a mixture of light brown and yellow, became popular in the 19th century when photographers used a chemical process to preserve photos. Nowadays, this effect is not only to imitate old photos, but also to add an artistic touch to modern images.
In digital photography, sepia toning is one of the most sought-after effects, especially for those who want to give a lasting impression to their work. Whether you’re a beginner looking to try out new techniques, or a professional looking to enrich your portfolio, sepia effects can be a great choice.
In this article, Bardimin will discuss three different ways to apply the sepia toning effect with Adobe Photoshop. Each way has a different level of difficulty and results, making it suitable for different skill levels. From basic techniques that are easy for beginners to follow to more complicated methods for more authentic results, this guide will help you turn ordinary photos into classic works of art, as if they were taken from an old family photo album.
1. Hue/Saturation Method
The first method we will discuss is using the Hue/Saturation Adjustment Layer. This is an easy way and suitable for beginners who are just learning photo editing in Adobe Photoshop. With simple steps, you can give your photos a distinctive sepia-toned effect.
Steps:
1. Open Image in Adobe Photoshop
First, open the image you want to edit in Adobe Photoshop. Make sure the image has a high resolution for better editing.
2. Add Hue/Saturation Adjustment Layer
Next, add Hue/Saturation Adjustment Layer. You can do this in two ways:
- Through the menu Layer > New Adjustment Layer > Hue/Saturation.
- Or by clicking the Adjustment Layer icon in the Layers panel, then selecting Hue/Saturation.
3. Check the Colorize box
Once the Adjustment Layer is open, check the Colorize box. This will change the slider range to just a positive value, making it easier to set the sepia color.
4. Set Hue to 27 and Saturation to 21
To achieve a typical sepia effect, set the Hue value to 27 and Saturation to 21. This value gives results close to the classic sepia color that is often present in old photos.

5. Crop the Image to a Square
To add a vintage feel, change the image format to square, mimicking photos from the 1940s era that usually use film roll cameras in a 1:1 format. How:
- Select the Crop tool from the toolbar on the left.
- Set the crop ratio to 1:1 (square).
- Adjust the crop area to your liking, then press Enter to apply it.
After following the steps above, your photo will have a distinctive yellowish-brown hue, creating the impression of a timeless old photo. If you want to add an extra touch, you can combine this effect with other techniques such as reducing contrast or adding noise to mimic the texture of an old-fashioned photo.
2. Method Black & White Adjustment
The second method we’ll discuss is to use Black & White Adjustment Layer. This method provides more accurate results and is closer to the original photos from the classical era. Compared to the Hue/Saturation method, this technique allows you to control in more detail how the black and white colors are converted into sepia shades, so that the result looks more natural and authentic.
Steps:
1. Open Image and Add Black & White Adjustment Layer
First, open the image you want to edit in Adobe Photoshop. Then, add Black & White Adjustment Layer by:
- Click the Adjustment Layer icon in the Layers panel, then select Black & White.
- Or through the menu Layer > New Adjustment Layer > Black & White.
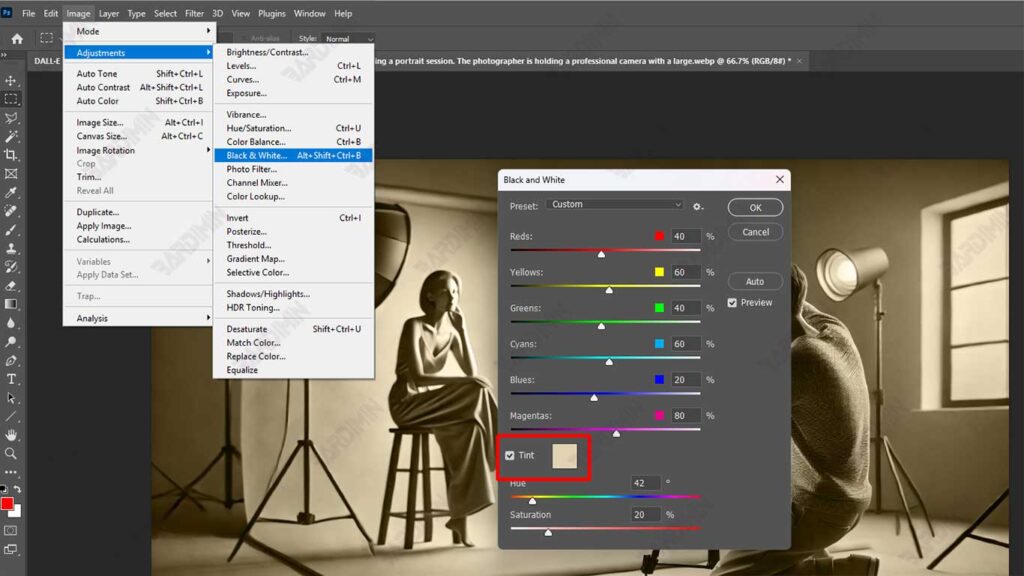
2. Click the Tint button
Once the Adjustment Layer is open, you’ll see various sliders to adjust the intensity of colors like red, green, and blue. At the top of the panel, there is a Tint button. Click this button to activate the tint effect. By default, the tint color that appears is close to sepia, so you don’t have to make a lot of adjustments.
3. Reduce Contrast with Brightness/Contrast Adjustment Layer
To add to the vintage feel, we can imitate the low-contrast effect often found in old photos. How:
- Add Brightness/Contrast Adjustment Layer via the menu Layer > New Adjustment Layer > Brightness/Contrast.
- In the panel that appears, slide the slider Contrast to the left until it reaches a value of around -20. This will reduce the contrast of the image, creating the effect of a photo that has faded over time.
4. Crop the Image into a Square Format
As in the previous method, you can add a vintage feel by changing the image format to a square, mimicking photos from the 1940s era that used a 1:1 film roll camera. How:
- Select the Crop tool from the toolbar on the left.
- Set the crop ratio to 1:1 (square).
- Adjust the crop area to your liking, then press Enter to apply it.
Advantages of the Black & White Adjustment Method:
This method provides results that are closer to the original photos from the classic era due to the more detailed control over color conversion.
You can adjust the intensity of the black and white colors before applying the sepia effect, so that the result is more to your liking.
Stronger Vintage Effect: By reducing the contrast, your photos will look like old photos that have undergone natural aging.
3. Method Greyscale Tritone
The third method we will discuss is Greyscale Tritone. This method produces an effect similar to the chemical process sepia toning used on old photographs. This technique is a bit more complicated than the previous two, but the results are very accurate and close to the original sepia photos from the classical era. This method is ideal for those who want to get a very precise and detailed sepia effect.
Steps:
1. Change Image to Greyscale Mode
First, open the image you want to edit in Adobe Photoshop. Then, change the image to Greyscale mode by:
- Open the menu Image > Mode > Greyscale.
- You will be asked to confirm the deletion of the color information. Click Discard to continue.
- If you use this feature frequently, you can check the option “Don’t show again” to save time in the future.
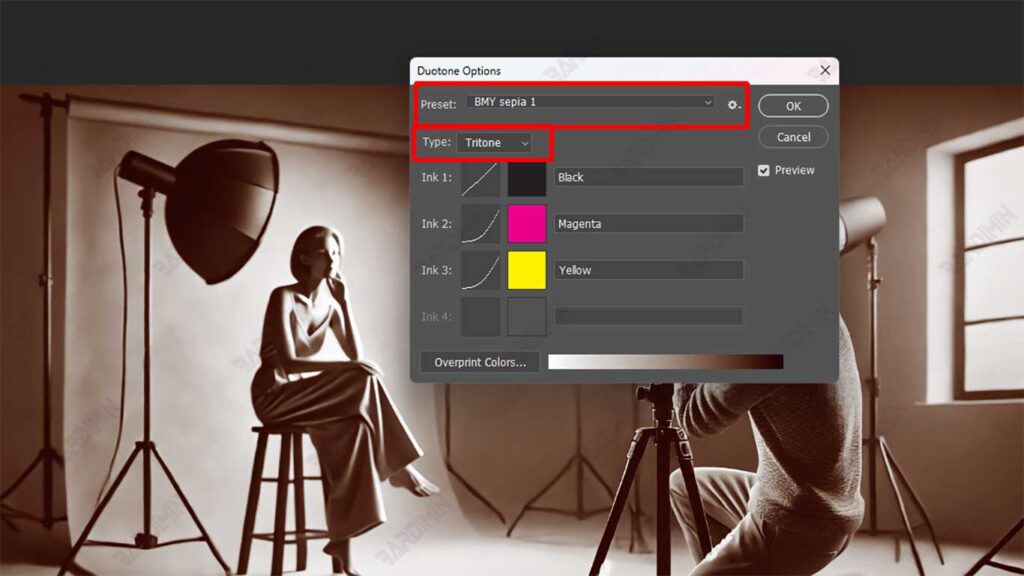
2. Select Duotone from the Image > Mode > Duotone Menu
Once the image has been converted to Greyscale mode, the next step is to convert it to Duotone mode. How:
- Open the menu Image > Mode > Duotone.
- On the Duotone Options panel that appears, click the Preset drop-down menu and look for a preset named “BMY sepia 1”.
- Select the preset to convert the image to Tritone mode, where the brightness of the image will be replaced by a combination of black, yellow, and magenta colors that create a highly accurate sepia effect.
3. Restore Image to RGB Mode
Once you’ve finished converting the image to Duotone mode, you’ll need to revert it to RGB mode to save the image in a common format like JPEG or PNG. How:
- Open the menu Image > Mode > RGB Color.
- Now your image is ready to be saved in the desired format.
Advantages of the Greyscale Tritone Method:
This method mimics the chemical process of sepia toning used in ancient photographs, so the results are very accurate and detailed.
By using the preset “BMY sepia 1”, you don’t have to make complicated manual adjustments.
This method is ideal for those who want to achieve a highly precise sepia effect, especially for projects that require a high level of accuracy.
Conclusion
With the three methods above, you can easily give a sepia toning effect to your photos. Each method has its advantages and disadvantages, so choose the one that best suits your needs. Sepia toning not only makes photos look more classic, but also adds artistic value to your photographic work.
Here is a comparison table of the three sepia toning methods that have been discussed:
| Method | Excess | Deficiency | Suitable For |
| Hue/Saturation Adjustment | ✔ Easy and quick to apply ✔ Suitable for beginners ✔ Flexible in sepia color adjustment | ✖ The color of the sepia may be less accurate than other methods | Beginners, users who need quick results |
| Black & White Adjustment | ✔ More accurate ✔ sepia color Can mimic the look of old photos with low contrast | ✖ Requires more steps ✖ May need additional adjustments | Photographers and designers who want more realistic effects |
| Greyscale Tritone | ✔ Most authentic results resemble real ✔ sepia More control over color tone | ✖ More complex ✖ processes Must be converted back to RGB for storage | Professionals who want the best results and more artistry |
The Hue/Saturation Adjustment method is perfect for beginners because it is easy and fast, while the Black & White Adjustment method provides a smoother and more realistic sepia effect. If you want the most authentic results with further control, the Greyscale Tritone method is the best option.