In today’s digital age, protecting personal and corporate data is becoming increasingly important, especially with the increasing threat of malware and data theft. Windows 11, the latest operating system from Microsoft, is equipped with various security features to help protect users from these threats. One proactive step that can be taken is to disable the USB port, which can prevent uncontrolled use of the USB Drive.
Uncontrolled use of USB drives can open loopholes for spreading malware and stealing confidential data. Therefore, this article aims to provide a step-by-step guide on disabling USB ports in Windows 11 to keep your data safe and secure.
Why Is Disabling USB Ports Important?
Data security is a top priority for individuals and companies. USB Drive can be a hazardous tool if not managed properly. Data theft often occurs through these external storage devices, where unauthorized parties can easily steal sensitive information.
For example, if an employee accidentally plugs an infected USB Drive into a company computer, confidential data such as customer information, financial documents, or business strategies can be stolen in a matter of seconds. By disabling USB ports, you can significantly reduce this risk and protect your valuable assets.
USB Drive is also one of the main factors in the spread of malware. Many types of malware, including viruses, trojans, and ransomware, can spread through external storage devices. When infected USB drives are plugged into a computer, the malware can quickly infect the system and spread to a wider network.
Access control is an important aspect of data security management. Both companies and individuals need to have strict control over who can use USB drives and for what purpose. In a corporate environment, uncontrolled access can lead to data leaks, security policy violations, and even legal action.
By disabling USB ports, companies can ensure that only authorized devices can connect to their systems, thereby improving security and reducing risk. For individuals, access control helps protect personal data from unauthorized use and keeps your privacy safe.
How to Disable USB Ports in Windows 11
Here are three methods to disable USB ports in Windows 11:
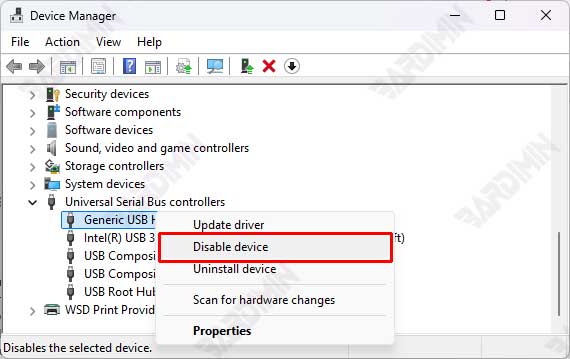
Using Device Manager
- Open Device Manager by right-clicking on the Start icon and then selecting Device Manager.
- Find and expand the Universal Serial Bus controllers option.
- Right-click on each item such as USB Root Hub (or USB 3.0 Root Hub if using USB 3.0) and select Disable device.
- To reactivate the USB port, repeat the same steps but select Enable device.
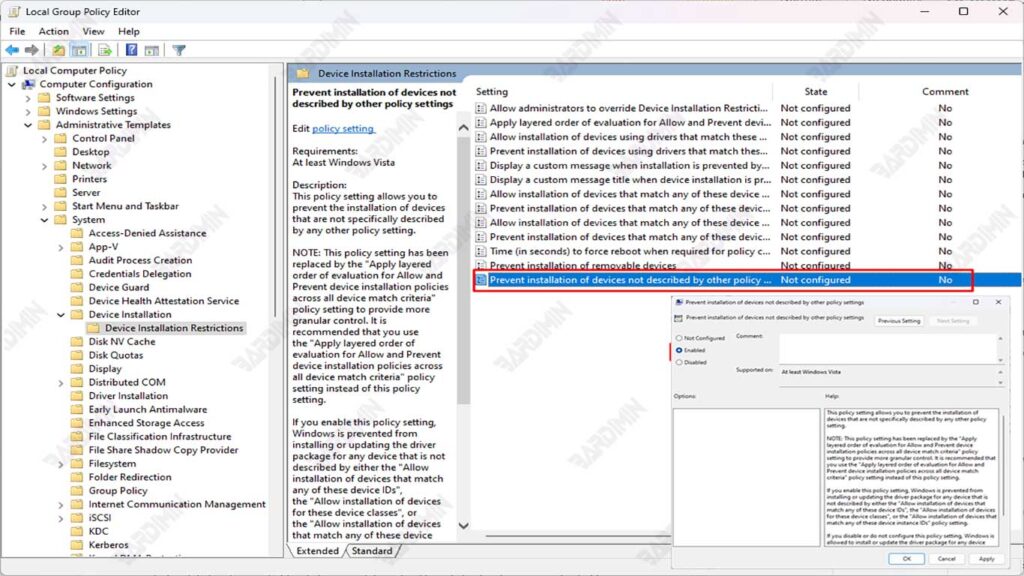
Using the Group Policy Editor
- Press Windows + R to open the Run window.
- Type gpedit.msc and then press Enter to open Group Policy Editor.
- Navigate to Computer Configuration > Administrative Templates > System > Device Installation > Device Installation Restrictions.
- Search and double-click on the policy Prevent installation of devices not described by other policy settings.
- Select Enabled and then click OK.
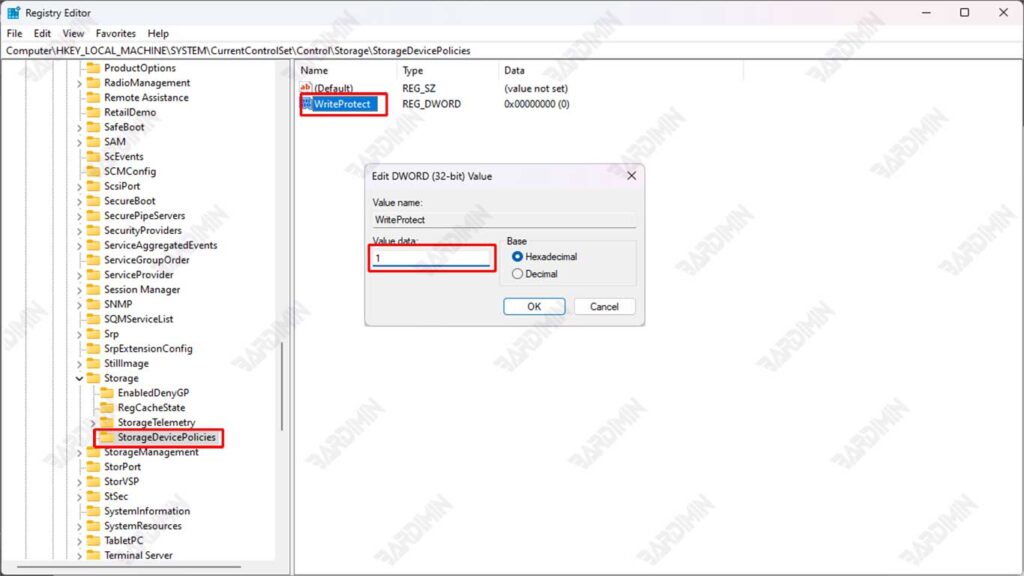
Using the Registry Editor
- Press Windows + R to open the Run window.
- Type regedit and then press Enter to open Registry Editor.
- Navigate to HKEY_LOCAL_MACHINE\SYSTEM\CurrentControlSet\Control\StorageDevicePolicies.
- If the StorageDevicePolicies key doesn’t exist, create a new key with that name.
- Right-click on the StorageDevicePolicies key and select New > DWORD (32-bit) Value.
- Name the new value with WriteProtect and then press Enter.
- Double-click on the WriteProtect value, set the Value data to 1 and then click OK.
Conclusion
In an increasingly complex digital world, maintaining data security and access control is critical. This article has discussed three effective methods to disable USB ports in Windows 11, namely through Device Manager, Group Policy Editor, and Registry Editor. By following the steps that have been described, you can reduce the risk of data theft and the spread of malware that often occurs through USB drives.
Deactivating USB ports is not only a preventive measure, but it is also part of a larger security strategy to protect sensitive information for both individuals and companies. With strict access controls, you can ensure that only authorized devices can connect to your system, thus maintaining data integrity.
Frequently Asked Questions (FAQs)
1. What happens if I disable the USB port?
Disabling USB ports will prevent all external storage devices, such as USB drives, from connecting to your computer. This means that you won’t be able to use a USB Drive to transfer data, but it will also protect your system from potential threats such as malware and data theft.
2. How do I reactivate a USB port that has been disabled?
To reactivate the USB port, you can follow the same steps that were used to disable it. If you are using Device Manager, simply right-click on USB Root Hub and select Enable device. If you are using Group Policy Editor or Registry Editor, you will need to change the setting back to the previous state (Disabled to Enabled).
3. Are there any other risks to be aware of when disabling a USB Drive?
Disabling USB ports can hinder the use of legitimate devices, such as a mouse or USB keyboard if you have no other alternatives. Also, if you need to transfer data using USB Drive, you will need to re-enable the port. Therefore, it is important to consider your needs before taking this step and ensure that you have a plan in place to manage access to USB drives securely.