Windows 11, the latest operating system from Microsoft, is designed to provide a more modern, fast, and efficient user experience. With a more intuitive interface, improved security features, and better integration with other devices, Windows 11 is a top choice for many users. However, like other operating systems, Windows 11 also receives regular updates from Microsoft. These updates aim to fix bugs, improve security, and add new features.
Even though updates are released with good intentions, not all updates run smoothly. Sometimes, installed updates cause new problems, such as unstable systems, unexpected errors, slow down computer performance, or even incompatibility with installed applications or drivers. These problems can be annoying, especially if you rely on your computer for daily work or other important activities.
In these situations, rolling back or uninstalling updates is an effective solution. By rolling back, you can restore the system to the state it was in before the update was installed so that the issue that arises can be resolved. Meanwhile, uninstalling updates allows you to remove problematic updates permanently.
Bardimin will provide a complete guide and detailed steps on how to roll back and uninstall updates in Windows 11. Not only that, but we will also share tips and tricks to avoid similar problems in the future. By following this guide, you can keep your Windows 11 system stable and performing optimally, without having to worry about problematic updates. Let’s get started!
Why Is It Necessary to Roll Back or Uninstalling Updates?
Although updates to Windows 11 were released to fix bugs, improve security, and add new features, not all updates worked as expected. There are a few reasons why you might need to roll back or uninstall updates. Here are some situations that often occur:
1. Compatibility Issues
Some updates may not be compatible with certain hardware, especially older ones. For example, updated drivers may not work properly on certain devices, so devices such as printers, scanners, or graphics cards cannot be used.
Updates can also cause incompatibilities with existing apps. Apps that were previously running well can suddenly experience crashes or errors after an update is installed. For example, certain productivity apps or games may not work properly anymore.
2. Bugs and Errors
Problematic updates can make the system unstable. You may experience a Blue Screen of Death (BSOD), frequently crashed apps or a system that suddenly restarts.
Some updates may bring new bugs that are not detected during testing. This can cause errors that didn’t exist before, such as network issues, difficulty accessing files, or problems with certain features such as the Start Menu or Taskbar.
3. Decreased Performance
Some updates can make the system run slower. You may experience longer boot times, slower applications to open, or less responsive systems.
Certain updates can increase CPU, RAM, or disk usage excessively. This can make the computer hot, drain the battery quickly (on laptops), or cause lag when running many applications.
4. Loss of Features or Settings
Occasionally, updates can remove or change previously existing features. For example, settings you’ve adjusted may be missing, or certain features in the Control Panel may no longer be accessible.
Updates can also change system settings without notice, such as privacy, security, or network settings. This can disrupt the user experience and require readjustment.
5. Unexpected Security Issues
While updates are usually released to improve security, sometimes updates can add new vulnerabilities that can be exploited by irresponsible parties.
Some updates may not match your existing antivirus or security software, causing conflicts that reduce system protection.
6. User Inconvenience
Some updates can change the user interface (UI) in major ways, such as menu layout, icons, or settings. These changes can make users feel uncomfortable or difficult to adjust.
Certain updates may add notifications or pop-ups that pop up constantly, disrupting user activity.
Steps to Rolling Back Updates in Windows 11
Rolling back updates in Windows 11 is a relatively simple process, but it’s important to do it carefully so as not to cause additional problems. Here is a step-by-step guide to restore the system to the state it was in before the update was installed:
1. Open Settings
Press the Windows + I keys on your keyboard at the same time. This will open the Settings (Settings) app in Windows 11.
Once the Settings opens, search for and select the Windows Update option from the left-hand menu. This option is usually under the System (System) section.
Note: If you can’t find Windows Update, make sure you’re using an administrator account, as some settings may not be available for regular user accounts.
2. Access Update History
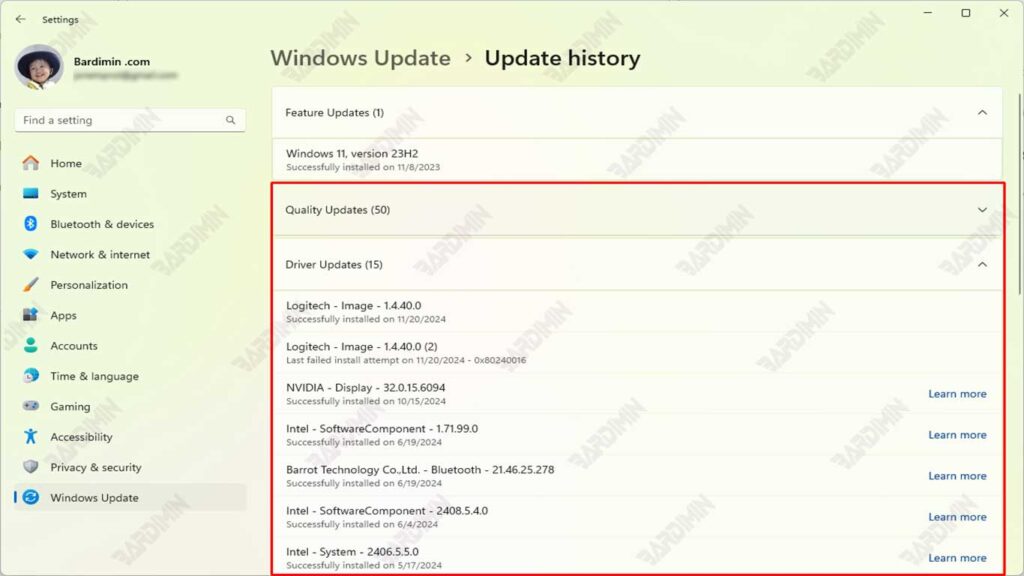
On the Windows Update page, scroll down until you find the Update history option. Click on this option to see a list of all the updates that have been installed on your system.
On the Update History page, you’ll see a list of updates grouped by category, such as Quality Updates, Driver Updates, and Definition Updates. Search for the update you want to roll back.
Tip: If you’re not sure which update is causing the problem, pay attention to the update installation date and compare it to the time when the problem started appearing.
3. Select Uninstall Updates
Once you’ve found the update you want to roll back, click on the Uninstall updates option which is usually located at the top of the Update History page. This will open a new window that displays a list of updates that can be uninstalled.
Find the update you want to remove from the list. Click on the update, then select Uninstall. You may be asked to provide confirmation or enter an administrator password.
Warning: Make sure you only remove updates that are causing the problem. Removing important updates can affect the security or stability of the system.
4. Restart the Computer
Once the uninstall process is complete, you will be prompted to restart your computer. Click Restart now to restart the system immediately.
After the computer restarts, the system will return to the state it was in before the update was installed. Check to see if the problem you’re experiencing is resolved.
Tip: If the problem persists after rolling back, you can try using the System Restore feature to restore the system to a previous restore point.
Steps to Uninstall Updates in Windows 11
Uninstalling updates in Windows 11 is a process that can help resolve system issues caused by problematic updates. Here is a step-by-step guide to uninstalling updates using Control Panel:
1. Open the Control Panel
Press the Windows key + R on your keyboard at the same time. This will open the Run window.
Type the control panel in the field provided, then press Enter or click OK. This will open Control Panel in Windows 11.
Note: If you prefer, you can also open the Control Panel by searching for it through the Start Menu or Search Bar.
2. Access Programs and Features
In the Control Panel window, find and select the Programs (Program) option.
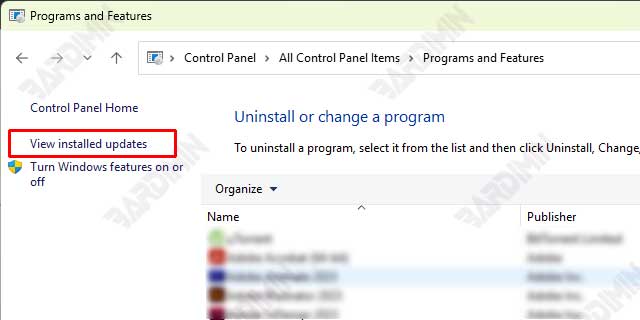
Under the Programs and Features section, click the View installed updates option. This will open a list of all the updates that have been installed on your system.
Tip: If you don’t see the View installed updates option, make sure that you use the Category (Category) view in the Control Panel. You can change this display in the upper-right corner of the Control Panel window.
3. Select the Updates You Want to Delete
On the Installed Updates page, you’ll see a list of updates grouped by category, such as Microsoft Windows, Drivers, and more. Find the update you want to remove.
Right-click on the update you want to uninstall and select Uninstall from the context menu that appears.
Warning: Make sure you only remove updates that are causing the problem. Removing important updates can affect the security or stability of the system.
4. Confirm and Restart
Once you’ve selected Uninstall, you’ll be prompted to confirm the action. Click Yes or Uninstall to continue.
The uninstall process will begin. Wait for the process to complete. The time it takes may vary depending on the size and type of update.
Once the process is complete, you will be prompted to restart the computer. Click Restart now to restart the system immediately.
Tip: If you don’t want to restart your computer right away, you can choose Restart later. However, be sure to restart your computer as soon as possible to apply the changes.
Conclusion
Rolling back and uninstalling updates in Windows 11 is an effective solution to overcome problems that arise after installing updates. By following this guide, you can easily restore your system to its previous state without having to worry about losing data or experiencing further issues.