Data protection is critical for individuals and companies in an increasingly connected era. One risk that is often overlooked is the spread of malware through removable storage devices, such as USB Flash Drives, External Hard Drives, and SD Cards. While these devices are very useful, they can also be an entry point for malware into your system.
This removable storage device is designed to facilitate data transfer between devices. However, this convenience also carries great risks. Devices such as USB Flash Drives and External Hard Drives can quickly become infected with malware, especially if used on unprotected computers. Once connected to other systems, malware can spread very quickly.
Different types of malware often spread through removable storage devices, such as autorun worms that instantly activate when the device is connected, ransomware that encrypts data and demands a ransom, and keyloggers that record keyboard activity including passwords and other sensitive information. These threats not only compromise personal data but can also cause significant financial and reputational losses, especially in the context of companies.
How Malware Spreads Through USB
Removable storage, such as USB, is particularly vulnerable to the spread of malware because it is easy to use and portable. Here are some of the main ways malware can spread through this storage:
Hidden Malicious Files
Malware is often hidden in files that look safe, such as documents, images, or applications. When users open the file, their system can be infected. This technique takes advantage of the user’s ignorance to execute malicious code unknowingly.
Autorun Exploits
Although the Autorun feature in Windows has been disabled for security, some malware still tries to exploit loopholes or other ways to run itself automatically when a USB is connected. This is especially true on systems that have not been updated or have weak security settings.
Man-in-the-Middle Attack
An attacker can modify a file on the USB to infect the device when it is accessed. This technique involves inserting malicious code into a file that appears to be legitimate so that when the user opens or runs the file, the malware activates and infects the system.
Types of Malware That Often Spread Over USB
USB is often a vehicle for different types of malware, each with different characteristics and impacts:
Autorun Malware: Runs Itself Automatically When USB Is Plugged In
Autorun Malware takes advantage of an old Windows feature that allows external devices to run files automatically. Although Windows 11 has disabled the Autorun.inf feature by default, some malware can still use other ways to infect the system, especially if the system has not been updated with the latest security patches.
Ransomware: Infecting and Encrypting Data
Ransomware is a serious threat that can spread through USB drives. Once it has successfully entered the system, the ransomware will encrypt the files and demand a ransom to return the data. Examples of ransomware that often spread through external storage include:
- Spora Ransomware: Attacking devices via USB and encrypting important files, usually with a large ransom demand.
- BadRabbit Ransomware: Spreads via external drives and locks the system, interrupting activity and asking for ransom for recovery.
Keyloggers and Trojans: Stealing User Data
Keyloggers are a type of malware that records every type on the keyboard, so hackers can steal passwords, banking information, and other sensitive data. Meanwhile, Trojan Horses are often hidden in files on USB drives. When the file is opened, hackers can access the victim’s device, steal data, install additional malware, or perform other malicious actions.
How to Disable Removable Storage in Windows 11
Disabling removable storage in Windows 11 is an important step to improve system security and prevent the spread of malware. One of the most effective ways to do this is to use Group Policy Editor (GPO), a built-in Windows tool that allows administrators to control various aspects of the system. Here is the full guide.
1. Using the Group Policy Editor (GPO)
Group Policy Editor is a very powerful tool for setting system policies in Windows 11. With this tool, you can disable access to removable storage such as USB Flash Drives, External Hard Drives, and SD Cards. Here are the steps:
Step 1: Open Group Policy Editor
1. Press the Windows + R keys on the keyboard to open the Run window.
2. Type gpedit.msc in the field provided, then press Enter.
Step 2: Navigate to Removable Storage Access
- Once Group Policy Editor opens, navigate to the following path:
Computer Configuration > Administrative Templates > System > Removable Storage Access- In the Removable Storage Access folder, you’ll see various policy options related to external storage devices.
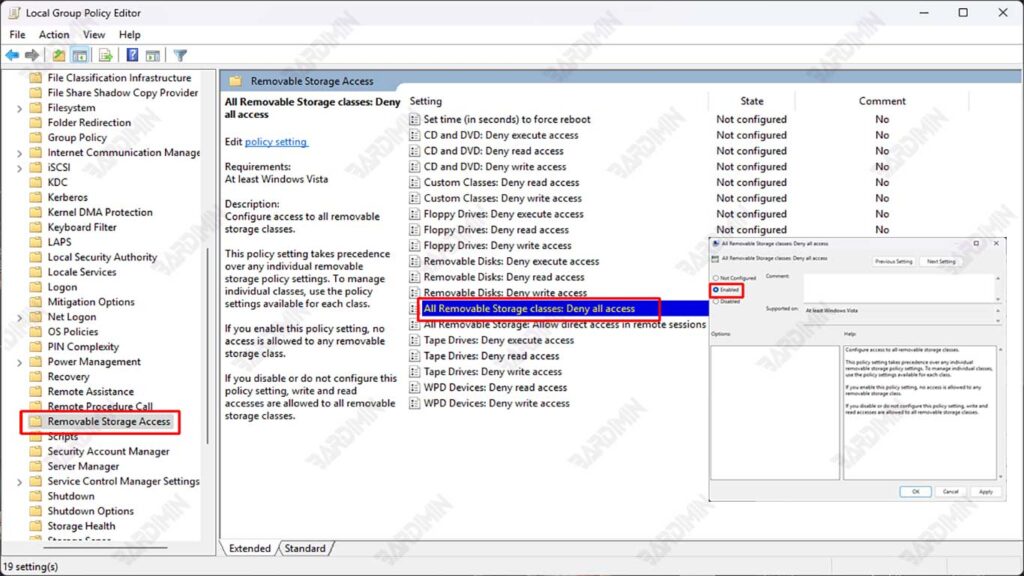
Step 3: Disable Access to All Removable Storage
- Look for an option named “All Removable Storage Classes: Deny All Access”.
- Double-click on the option to open the settings window.
- In the window that appears, select the Enabled option to disable access to all types of removable storage.
- Click Apply and OK to save the changes.
Step 4: Restart the Computer
- After you enable this policy, restart your computer to apply the changes.
- After the restart, all access to the removable storage will be disabled, including USB Flash Drives, External Hard Drives, and SD Cards.
Group Policy Editor is only available on Windows 11 Pro, Enterprise, and Education. If you’re using Windows 11 Home, you’ll need to use Registry Editor or a third-party tool.
This policy will block all types of removable storage. If you only want to block certain types (for example, only USB Flash Drives), you can set more specific policies in the Removable Storage Access folder.
2. Using the Registry Editor
Registry Editor is a tool that allows you to make in-depth changes to your Windows 11 system. By editing the registry, you can block access to removable storage such as USB Flash Drives, External Hard Drives, and SD Cards. Here are the steps:
Step 1: Open Registry Editor
- Press the Windows + R keys on your keyboard to open the Run window.
- Type regedit in the field provided, then press Enter.
- If you see a User Account Control (UAC) alert, click Yes to continue.
Step 2: Navigate to the Right Key
- Once Registry Editor opens, navigate to the following path:
HKEY_LOCAL_MACHINE\SOFTWARE\Policies\Microsoft\Windows\RemovableStorageDevices- If the RemovableStorageDevices folder doesn’t exist, you can create it manually. Right-click on the Windows folder, select New > Key and give it a RemovableStorageDevices name.
Step 3: Create a New DWORD to Block Removable Storage
- In the RemovableStorageDevices folder, right-click on an empty area and select New > DWORD (32-bit) Value.
- Name the new DWORD Deny_All.
- Double-click on the Deny_All, then change the Value data to 1.
- Click OK to save the changes.
Step 4: Restart the Computer
- After making changes, restart your computer for the new settings to take effect.
- After restarting, access to all removable storage will be blocked.
3. Using PowerShell
In addition to using Group Policy Editor and Registry Editor, you can also disable removable storage in Windows 11 by using PowerShell. PowerShell is a powerful command-line tool that allows administrators to automate system tasks, including blocking access to removable storage. Here is the full guide.
Steps to Disable Removable Storage with PowerShell
- Click Start, type PowerShell, then right-click on Windows PowerShell and select Run as Administrator.
- If you see a User Account Control (UAC) alert, click Yes to continue.
- Enter the following command in PowerShell to block access to all removable storage:
Set-ItemProperty -Path “HKLM:\SOFTWARE\Policies\Microsoft\Windows\RemovableStorageDevices” -Name “Deny_All” -Value 1 -Type DWordThis command will create or change the value of the Deny_All in the registry to 1, which means access to all removable storage is blocked.
- Press Enter to execute the command.
- After running the command, restart your computer for the changes to take effect. After restarting, access to all removable storage such as USB Flash Drives, External Hard Drives, and SD Cards will be disabled.
How to Restore Access to Removable Storage
If at any point you need to restore access to removable storage, you can use PowerShell to delete or change the registry values that have been created. Here are the steps:
- Follow the same steps as before to open PowerShell with administrator privileges.
- Enter the following command in PowerShell to restore access to removable storage:
Set-ItemProperty -Path “HKLM:\SOFTWARE\Policies\Microsoft\Windows\RemovableStorageDevices” -Name “Deny_All” -Value 0 -Type DWordThis command will change the value of Deny_All to 0, which means access to removable storage is allowed again.
- Press Enter to execute the command.
- Restart your computer for the changes to take effect.
4. Using Windows Defender and Endpoint Security
In addition to the manual method, you can also take advantage of Windows 11’s built-in security tools such as Microsoft Defender for Endpoint or third-party software to prevent access to removable storage.
Leverage Microsoft Defender for Endpoint
Microsoft Defender for Endpoint is a powerful security solution to automatically block access to removable storage.
The setup steps:
- Open Microsoft Defender Security Center.
- Select Device Control > Removable Storage Access Control.
- Create a new policy to block access to removable storage.
- Apply the policy to the devices you want to protect.
Third-Party Security Software Recommendations
If you’re looking for a more complete solution, some third-party security software to consider are:
- Symantec Endpoint Protection: Offers effective USB blocking and endpoint protection features.
- Bitdefender GravityZone: Allows access control to removable storage and protects the system from malware.
- McAfee Endpoint Security: Provides end-to-end security features, including blocking external devices.
Disabling removable storage in Windows 11 is an important step to prevent malware infections and improve system security. With methods such as Group Policy Editor, Registry Editor, Windows Defender, and PowerShell, you can block access to external storage devices such as USB Flash Drives, External Hard Drives, and SD Cards.
For maximum protection, it is recommended to combine various security methods and implement strict Endpoint Security policies. Implement these strategies immediately to protect your data and systems from increasingly sophisticated cyber threats. Digital security is our shared responsibility, start acting now!