Network issues often occur due to improper IP settings or IP address conflicts. One effective way to get around this is to set up Dynamic Host Configuration Protocol (DHCP) in Windows, which can help automate IPv4 and IPv6 settings.
DHCP is a protocol that allows devices in a network to automatically obtain an IP address from a DHCP server. In large environments, these addresses are typically pulled from the address pool that exists on the DHCP server, making it easier to manage the network and reducing the risk of typos and address conflicts.
What is DHCP?
Dynamic Host Configuration Protocol (DHCP) automatically assigns IP addresses to devices in the network. Each device needs a unique IP address to communicate with other devices. With DHCP, these addresses are retrieved from a pool stored on a DHCP server, making address assignments more efficient and organized.
When a device connects to a network, DHCP will automatically provide an available IP address, as well as other configuration information such as a subnet mask and default gateway. This process reduces the need to manually set up each device, saving time and reducing the possibility of errors in configuration.
Benefits of Using DHCP on Large Networks
Using DHCP provides several important benefits, especially on large networks with multiple devices:
- Reduce Manual Errors: With the automation of IP settings, typing errors can be avoided, so connection issues can be minimized.
- Prevents IP Conflicts: DHCP servers manage settings centrally, ensuring that no two devices have the same IP address, thus reducing conflicts that can disrupt the network.
- Efficiency in Network Management: With DHCP, administrators can automatically manage IP addresses without the need to manually set up each device, saving time and resources.
- Better User Mobility: DHCP makes it easier for devices to move from one network to another, as IP addresses can be dynamically adjusted.
How DHCP Works
The process of assigning IP addresses by Dynamic Host Configuration Protocol (DHCP) is carried out through several regular steps. When a device (client) connects to the network, it sends a request to get an IP address. This process is known as DHCP handshake, which consists of four main steps:
- Discover: The client sends a DHCP Discover message to the network to find an existing DHCP server.
- Offer: The DHCP server that receives the Discover message will reply by sending a message DHCP Offer, which includes the available IP addresses and other configuration information.
- Request: After receiving the offer from the server, the client will send a DHCP Request message to the server to request the IP address that has been offered.
- Acknowledgment: The DHCP server then sends a DHCP Acknowledgment (ACK) message to the client, indicating that the IP address has been allocated and is ready to be used by the device.
In this way, client devices can obtain IP addresses automatically without the need for manual setup, saving time and reducing the risk of errors.
Address Pool and How DHCP Servers Work
An address pool is a collection of IP addresses that are stored on a DHCP server and are ready to be assigned to client devices. This pool typically consists of a range of IP addresses defined by the network administrator. When the DHCP server receives a request from a client, it will select one of the addresses from the pool available to provide to the device.
How a DHCP server works includes several important functions:
- Data Storage: The server stores information about the addresses that have been provided and that are still available in the pool. This helps prevent address conflicts by ensuring that each device gets a unique address.
- Address Lease Management: Whenever an IP address is assigned to a client, the DHCP server also assigns a lease period for that address. After the lease period ends, the client must renew the request to continue using that IP address.
- Relay Agent: If the network has multiple subnets, there is no need for a DHCP server in each subnet. Instead, the server can use a relay agent to forward DHCP messages between the client and the server, so that all devices in various subnets can obtain IP addresses.
How to Enable DHCP on Windows
Enabling DHCP for IPv4 and IPv6 in Windows is essential for the network to function properly without IP address issues. Here are the steps to enable DHCP on your Windows device.
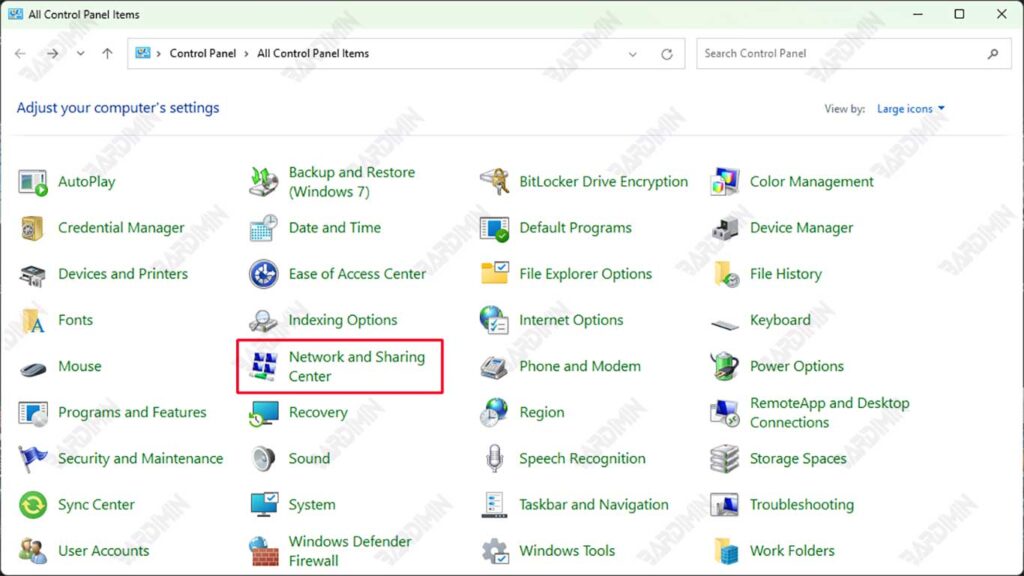
1. Access Network and Sharing Center
The first step is to open the Network and Sharing Center, where you can set up your network settings:
- Open the Control Panel in Windows, then select Network and Sharing Center.
- You can also sign in through Settings in Windows and select Network & Internet.
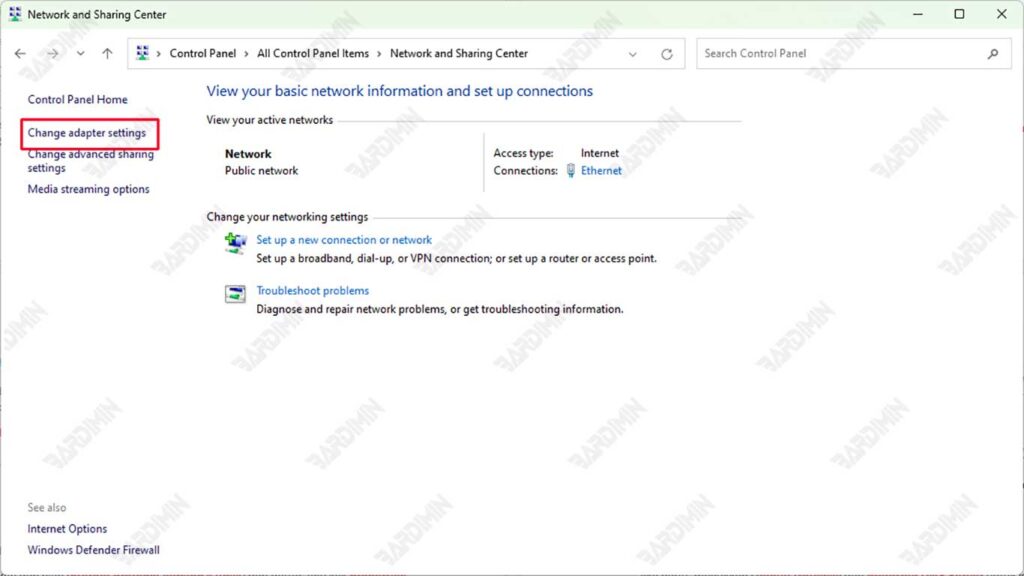
2. Change Adapter Settings
Once you’re in Network and Sharing Center, follow these steps to change your network adapter settings:
- Click Change Adapter Settings on the left side of the window.
- Select an active network adapter (such as Wi-Fi or Ethernet), then right-click on the adapter and select Properties.
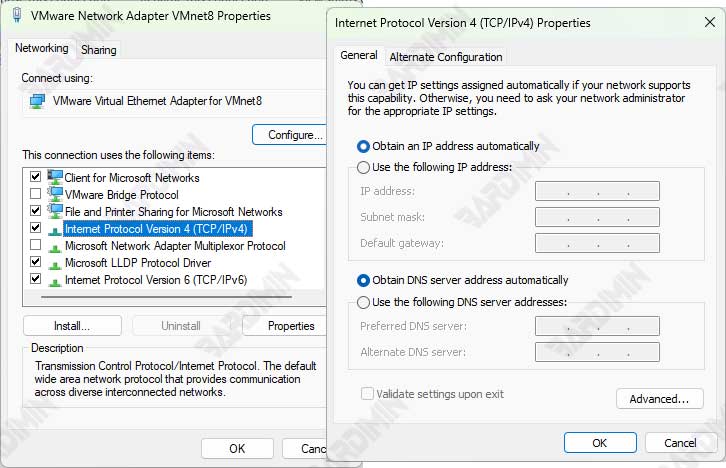
3. Setting IPv4 for DHCP
To enable DHCP on IPv4, follow these steps:
- Find and select Internet Protocol Version 4 (IPv4) from the list, and then click Properties.
- On the General tab, select the Obtain an IP address automatically option. With this option, your device will automatically get an IP address from the DHCP server.
- Click OK to save the changes, and you’ll be taken back to the Properties adapter window.
4. Setting up IPv6 for DHCP
Next, you can enable DHCP on IPv6 if your network supports it:
- In the Properties adapter window, search for Internet Protocol Version 6 (IPv6) and click Properties.
- On the General tab, select the Obtain an IPv6 address automatically option. This allows the device to obtain an IPv6 address automatically.
- Click OK, then Close to close the adapter settings.
When DHCP Doesn’t Work
Sometimes, even though DHCP is already enabled, there are times when we need to provide an IP address manually. This usually happens when the DHCP server can’t provide an IP address automatically or certain devices don’t support DHCP.
Situations Where Manual Assignment Is Required
- Devices That Don’t Support DHCP: Some older devices, such as older printers or older networking devices, may not be able to use DHCP. In this case, the IP address must be manually set for the device to connect to the network.
- Problems with DHCP Server: Sometimes, DHCP servers experience problems or are inactive on the network, so the device cannot get an IP address automatically. Manual assignments are the solution to maintaining the connection maintained.
Steps to Manually Assign an IP Address
If you need to set up an IP address manually, follow these steps:
1. Access Adapter Settings
- Open Network and Sharing Center as previously explained.
- Click Change Adapter Settings, select an active network adapter (such as Wi-Fi or Ethernet), right-click, and select Properties.
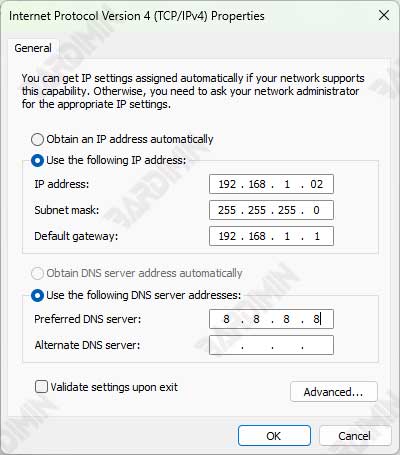
2. Changing IP Address Settings
- Select Internet Protocol Version 4 (IPv4) or Internet Protocol Version 6 (IPv6) according to the network you are using, and then click Properties.
- Uncheck the Obtain an IP address automatically option to disable DHCP on your device.
- Enter the desired IP address and subnet mask. To avoid conflicts, make sure this IP address is unique on your network.
3. Additional Settings (Optional)
- If necessary, enter Default Gateway and Preferred DNS Server for a more stable network connection.
- Click OK to save the changes, and the adapter will use the manual IP address you have set.
Conclusion
Correct DHCP settings aare essential for maintaining a stable and efficient network connection. By enabling DHCP, devices can automatically obtain IP addresses, prevent address conflicts, and make network management easier, especially on networks with multiple devices. DHCP also reduces manual errors in IP address assignment, thus reducing the likelihood of connection issues.
However, to maintain optimal network performance, it is highly recommended to perform regular maintenance on the network system. This includes checking the DHCP server, updating the software, and checking the configuration of network devices. This maintenance will help prevent future connection issues and ensure that the network remains running properly and reliably.