Have you ever encountered a problem opening an Excel file containing a Combobox in Google Sheets, where the dropdown suddenly disappears or can’t be clicked? Don’t worry, you’re not alone! Many Excel users are frustrated because Form Control features like Combobox are often incompatible when converted to Google Sheets.
But don’t worry, in this guide, you’ll learn how to create a Combobox in Excel that is 100% functional when opened in Google Sheets, without the need for complicated coding!
Combobox is a crucial feature for creating interactive dropdowns, input forms, or dynamic dashboards. If you collaborate frequently with teams that use Google Sheets, this compatibility is a must!
Excel and Google Sheets Compatibility Requirements
Optimal Excel File Format to Upload to Google Sheets (.xlsx vs .xls)
When transferring files from Microsoft Excel to Google Spreadsheets, file formats play a crucial role in maintaining the integrity of data and features that have already been created, including Combobox.
Format .xlsx (Office Open XML Format)
This format is the most recent standard used since Microsoft Excel 2007. Google Spreadsheet has an excellent level of compatibility with .xlsx files, including in the case of Data Validation (Drop-down List). Therefore, to transfer data to Google Sheets, it is always recommended to save the file in .xlsx format.
Legacy Binary Format .xls
The .xls format is older (Excel 97-2003), which, although it can still be opened in Google Sheets, has significant limitations. Some modern features, including advanced data validation, conditional formatting, and certain form controls, may not be fully recognized.
Excel Features That Aren’t Fully Compatible in Google Sheets
While many Excel features work well in Google Sheets, some features aren’t technically fully supported or don’t even work at all, including:
| Excel Features | Status in Google Sheets | Information |
| ActiveX Controls (Form Controls) | Not supported | Google Sheets doesn’t recognize ActiveX controls. |
| VBA Macro | Not supported | Google Sheets uses Google Apps Script, not VBA. |
| Data Validation based on complex formulas (Indirect, Named Range complex) | Some | Some formulas need to be adjusted. |
| Advanced PivotTable | Limited | The Pivot function is available but with simpler capabilities. |
| Slicer and Timeline | Not fully supported | Some filter visualizations are not available. |
| Conditional Formatting with many rules | Some | There is a limit to the number of rules and formulas that are supported. |
Especially for Combobox, as long as you use a simple Data Validation List (both manual entry lists and data-range based lists), Google Sheets can generally read and apply the feature without any problems.
Steps to Create a Combobox in Excel
Creating a Combobox (Drop-down List) in Excel is a very easy process to do, as long as you follow systematic steps. With the right settings, the results will be optimally compatible, even when the file is opened in Google Spreadsheet.
1 Creating a Source Data List
The first step in creating a Combobox is to prepare source data that will be selected in the drop-down list. This data can be text, numbers, or specific code that is relevant to your data input needs.
For example, make a list in a specific column:
| A |
| Option 1 |
| Option 2 |
| Option 3 |
| Option 4 |
Make sure there are no blank or duplicate cells if needed.
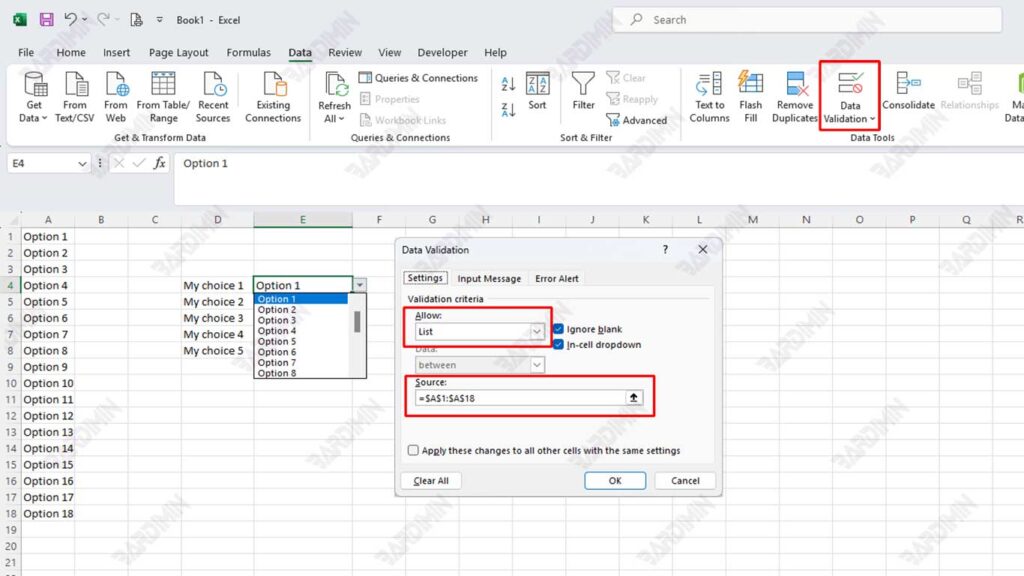
2 Enabling Data Validation
Once the source data is ready, the next step is to set the Data Validation to create a Combobox.
Steps:
- Select the cell or range where the Combobox will be applied.
- Open the menu Data → Data Validation.
- In the Allow section, select the List option.
- In the Source section, enter the data reference: =$A$1:$A$4
Make sure the sign equal to (=) is prefixed in the input source.
Avoid using spaces or special characters in range names to be compatible with Google Spreadsheets.
Testing Excel Files in Google Sheets
After creating a Combobox in Excel, the next step is to ensure that the feature remains working properly when the file is moved to Google Spreadsheet. This testing process is very important to do, especially if the file will be used in cross-platform collaboration.
Uploading Excel Files to Google Drive
Before testing, Excel files need to be uploaded to Google Drive. Here are the steps:
- Go to your Google account and access Google Drive.
- Click the New → File Upload button.
- Select the .xlsx formatted Excel file that you have prepared.
- Wait for the upload process to complete.
Open a file using Google Sheets.
Once the file has successfully been uploaded to Google Drive, test it by opening it through Google Sheets:
- Right-click on the uploaded Excel file.
- Select the Open with → Google Sheets option.
- Your Excel file will now open in Google Sheets format.
Google Sheets will automatically convert and adapt features in Excel files, including Data Validation (Combobox) that have been created beforehand.
Ensuring That the Combobox Keeps Running Properly
Once the file is open in Google Sheets, do some checks:
- Hover over the cells that have been assigned a Combobox.
- Make sure the drop-down list appears according to the choices you made in Excel.
- The trial selects multiple options to ensure validation goes well.
- Try entering data outside of the drop-down option to make sure the Error Alert still works.
If all the settings work as in Excel, then your file is declared fully compatible.
By conducting these tests carefully, you can ensure that Excel files with Combobox features can be used effectively and stably in Google Spreadsheet environments, without sacrificing data accuracy or user convenience.