Being locked out of your Windows 10 or 11 administrator account is a common yet critical issue that can halt productivity. This detailed guide provides a step-by-step technical solution using the bootable “chntpw” tool to reset a forgotten Windows administrator password, offering a lifeline for IT professionals, technicians, and power users without resorting to a system reinstall.
Losing access to the primary administrator account on Windows poses a significant problem. Many users feel forced to perform a full system reinstallation, a time-consuming process that risks data loss. However, there are more efficient methods available.
For accounts linked to a Microsoft online profile, a password reset can be initiated on their official website. For local accounts, the open-source utility chntpw becomes invaluable. This tool directly modifies the Windows registry SAM file to clear or change the Windows administrator password.
How to Reset a Windows Administrator Password Using chntpw
Follow these technical instructions to regain access. You will need physical access to the computer and a USB flash drive.
1. Download and Create the chntpw Bootable Media
First, obtain the latest chntpw ISO file from its official download page. You can prepare either a CD or a USB drive.
- CD Method: Burn the downloaded ISO file onto a blank CD using disc burning software.
- USB Method: Extract the ISO contents and copy all files directly to the root of a formatted USB drive.
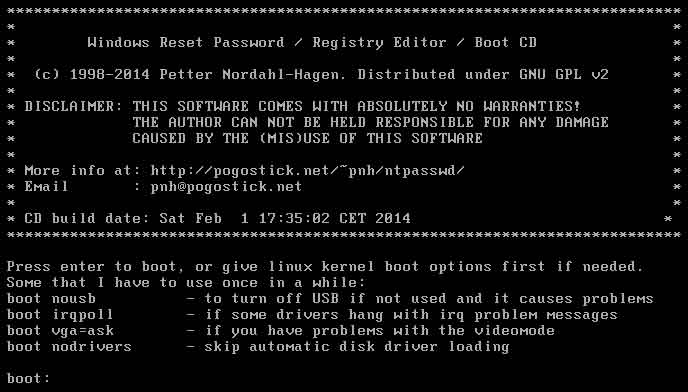
2. Boot the Target Computer from the Media
Insert the USB drive or CD into the locked computer. Restart it and enter the boot menu (typically by pressing F12, F2, or Esc during startup). Select your bootable media to launch the chntpw environment.
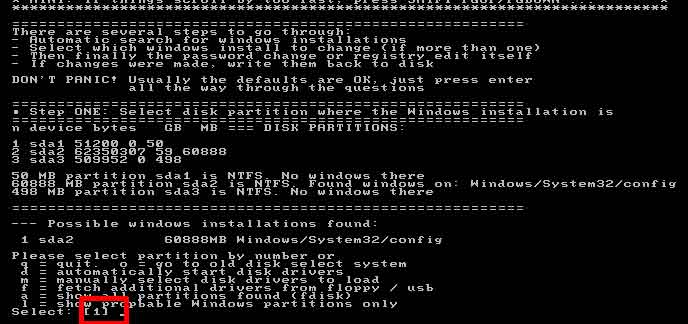
3. Locate the Windows Installation Partition
After the tool loads, press Enter. It will display all available disk partitions. Identify and select the number corresponding to the partition where Windows is installed (often number 1). Press Enter, then select the default Windows directory path by typing 1 again.
4. Access and Modify the SAM Registry File
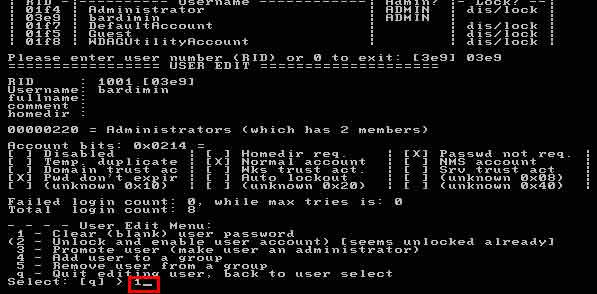
chntpw will scan for registry files. Choose option 1 to edit user data and passwords stored in the SAM hive. A list of user accounts will appear. Select the target administrator account by entering its RID number (e.g., 01c4 for the default Administrator).
5. Clear the Password and Finalize Changes
In the user editing menu, select option 1 to clear (blank) the user password. Type q to quit the user menu, and then type q again to exit the registry editor. To save all modifications, type y and press Enter when prompted.
6. Reboot and Log In Without a Password
Remove the bootable media. Type reboot at the command prompt or manually restart the computer. The system will now boot into Windows. You can log into the administrator account without a password. Immediately set a new Windows administrator password via Settings > Accounts for security.
Important Considerations and Alternative Methods
The chntpw tool is powerful and should be used ethically only on systems you own or have explicit permission to manage. Always adhere to local cybersecurity laws and regulations.
For modern systems, Windows 10 and 11 offer a “Reset PIN” option on the login screen if your account uses one. Additionally, Microsoft recommends creating a Password Reset Disk in advance as a proactive safeguard for local accounts.
By following this guide, you can effectively resolve a lost Windows administrator password while preserving all user data and installed applications. This approach saves considerable time and effort compared to a full system reinstall. Therefore, keeping a chntpw bootable USB in your IT toolkit is a wise prepartion for such emergencies.