Manually renaming hundreds or thousands of files in Windows is inefficient and prone to errors. This article details a precise method for renaming Windows files in bulk by combining the power of Command Prompt (CMD) and Microsoft Excel. This comprehensive guide is designed for IT professionals, system administrators, and advanced users needing to manage large file catalogs, including digital assets, project documents, or game modification files.
Windows File Explorer does provide basic rename functionality. However, it is severely limited when facing scenarios like reorganizing 500 product photography images, changing monthly financial report naming patterns, or adjusting game mod filenames for compatibility. Doing this manually not only wastes hours but also increases the risk of human error that can disrupt data order.
Fortunately, the Windows operating system includes very powerful built-in tools. By leveraging Command Prompt (CMD) and Microsoft Excel, you can build a systematic workflow to rename files in bulk using CMD. This method provides full control over the new naming pattern, supports special characters, and, most importantly, requires no third-party software installation, making it safe and lightweight.
Why the CMD and Excel Method is Superior
| Method | Advantages | Disadvantages | Ideal Use Case |
|---|---|---|---|
| File Explorer (Manual) | Simple, no new commands to learn. | Very slow for >10 files, error-prone, limited patterns. | Renaming 2-5 randomly named files. |
| PowerShell Script | Full automation, highly flexible and powerfull. | Requires deeper scripting knowledge. | Enterprise-scale deployment, complex rename logic. |
| Third-Party Applications | User-friendly graphical interface (GUI). | Potential malware risk, limited features in free versions. | Non-technical users with simple rename patterns. |
| CMD + Excel (This Method) | Full control, no installation, 100% accurate, suitable for hundreds/thousands of files. | Requires basic understanding of Excel and CMD. | Technicians, archivists, photographers, gamers (modding), data administrators. |
Step-by-Step Guide: Bulk Rename Files with CMD and Excel
Before starting, it is highly recommended to create a backup or copy of the target folder containing the files to another location. This is a mandatory safety step to prevent data loss due to accidental mistakes.
Step 1: Prepare the Work Environment and Extract the File List
First, navigate to the folder containing the files to be renamed. You can open that folder in File Explorer. Next, open Command Prompt with administrator privileges to avoid permission issues. A quick way is to type “cmd” in the File Explorer address bar, then press Ctrl+Shift+Enter.
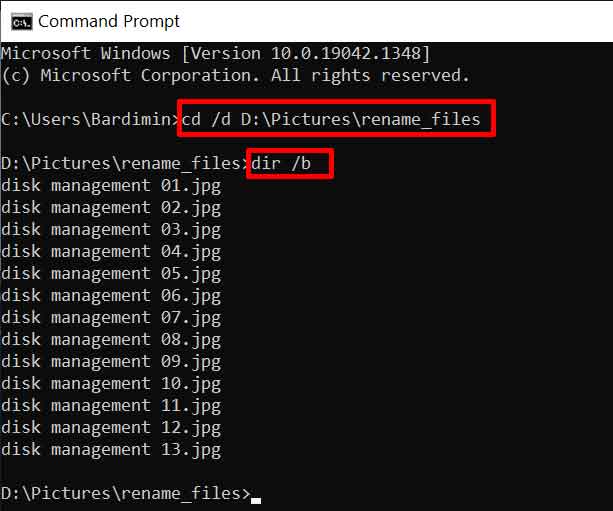
In the CMD window, ensure the directory path is correct. Then, execute the following command to export a list of all filenames (without folders/subdirectories) to a text file:
dir /b > original_list.txt
Command Explanation:
– dir: Command to display directory contents.
– /b: The “bare format” option that shows only filenames and extensions, without headers, size, or date.
– >: Redirect operator that directs the output (command result) to a file.
– original_list.txt: Name of the new text file to be created, containing the file list.
Step 2: Process and Design New Names in Microsoft Excel
Open the newly created original_list.txt file with Microsoft Excel. Excel will guide you through the Text Import Wizard. Choose the “Delimited” option, then in the next step, ensure no delimiters are checked. This way, each line (each filename) will be placed into a single cell in Column A.
In Column B, you can now design the new filenames. Excel’s power can be utilized here. Examples of patterns you can create:
- Adding Prefix/Serial Number: Use the formula
="PRODUCT_" & TEXT(ROW(A1),"000") & MID(A1, FIND(".",A1))to generate “PRODUCT_001.jpg”, “PRODUCT_002.jpg”, etc. - Changing Specific Extensions: Use
=IF(RIGHT(A1,3)="txt", LEFT(A1, LEN(A1)-3) & "md", A1)to change all .txt files to .md. - Text Formatting: Use the
UPPER(),LOWER(), orPROPER()functions to standardize capitalization.
Step 3: Build and Generate Ready-to-Execute CMD Commands
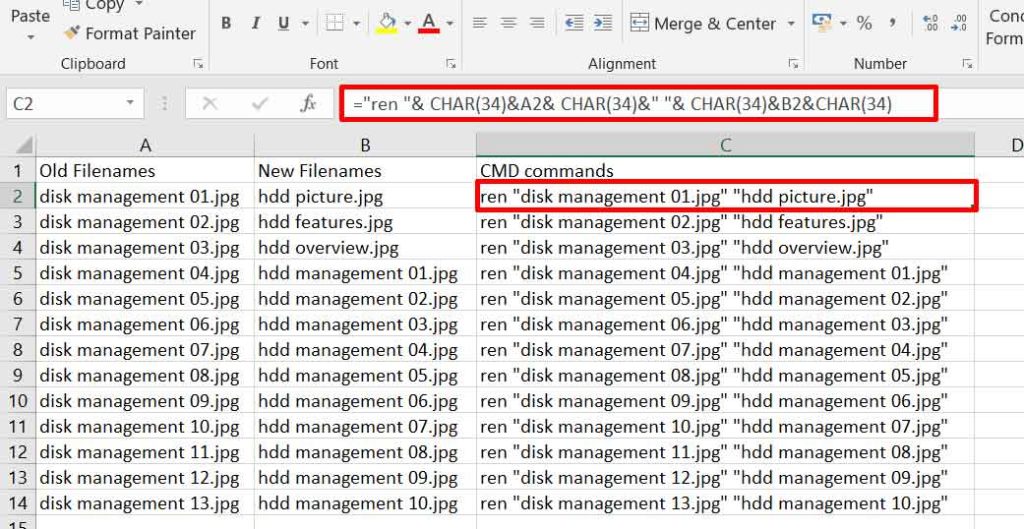
Once Column B (new names) is filled, we will build the complete CMD command in Column C. The basic syntax for the rename command in CMD is: ren "old_name" "new_name". Quotation marks (") are crucial if the filename contains spaces.
Enter the following formula into cell C2 (assuming data starts from row 2):
="ren " & CHAR(34) & A2 & CHAR(34) & " " & CHAR(34) & B2 & CHAR(34)
Formula Explanation:
– ="ren ": The fixed part of the command.
– & CHAR(34) & A2 & CHAR(34): Adds a quotation mark, then the old name (from cell A2), then a closing quotation mark.
– & " ": A space separator between arguments.
– & CHAR(34) & B2 & CHAR(34): Adds a quotation mark, the new name (from cell B2), and a closing quotation mark.
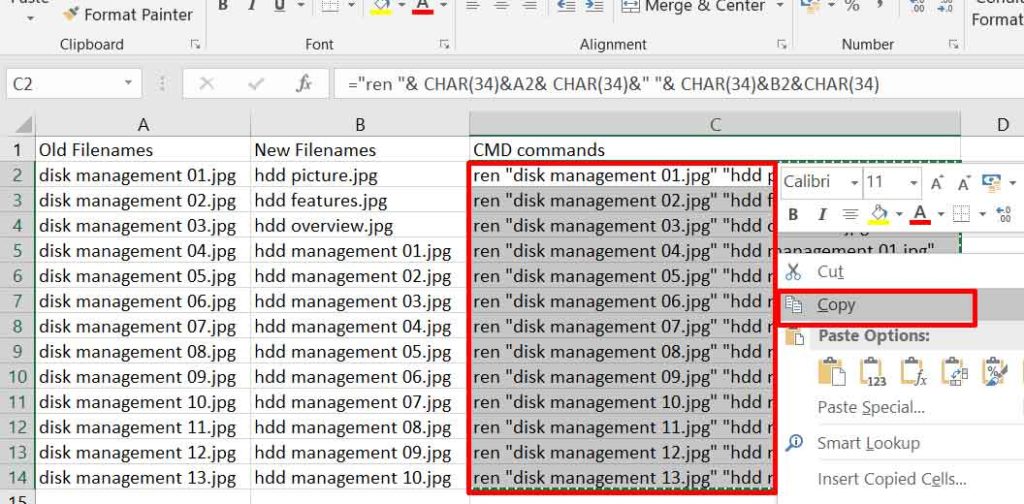
Copy this formula down the entire Column C to the end of the file list. Column C now contains hundreds of valid, ready-to-use ren commands.
Step 4: Final Execution and Result Verification
Return to the Command Prompt window. Ensure you are still in the correct directory. Copy the entire content of Column C from Excel, then paste it directly into the CMD window by right-clicking (or pressing Ctrl+V).
CMD will execute each command line sequentially and very quickly. To verify all files have been successfully renamed, run the command dir /b > new_list.txt and compare its contents with your initial plan in Excel.
Pro Tips and Official Reference Sources
For a deeper understanding of CMD command syntax, always referring to official Microsoft documentation is essential. This is part of applying E-E-A-T (Experience, Expertise, Authoritativeness, Trustworthiness) principles.
- REN Command Reference: Official Microsoft documentation for the ‘ren’ command (nofollow external link).
- DIR Command Reference: Official Microsoft documentation for the ‘dir’ command and all its parameters (nofollow).
Important Tips:
1. For files with very long names, ensure the “Long Path” option in Windows is enabled.
2. If the rename process fails for a few files, check if those files are currently open or locked by another application.
3. Use the TRIM() function in Excel on Column B to remove invisible leading/trailing spaces in filenames that may cause issues.
Conclusion
The method for renaming Windows files in bulk using CMD and Excel provides a powerful, accurate, and cost-free solution. It transforms a previously tedious, repetitive task into an automated and controlled process. By mastering this technique, your productivity in managing digital assets, work documents, or personal file collections will significantly improve.
Therefore, for technicians, gamers actively modding games, or professionals working with large volumes of data, this skill is no longer just a trick but a core competency essential for working intelligently and efficiently in a Windows environment.