Connecting a PC client to a domain network is a critical step in IT infrastructure. This process, commonly called a Windows domain join, enables centralized management of users, security policies, and resources. This article provides an up-to-date technical guide on renaming a computer and correctly joining a Windows Server domain, following best practices for network administrators and technicians.
After successfully promoting a Windows Server as a Domain Controller, the next step is integrating the PC client into that domain. The Windows domain join process is essential for applying Group Policies and centralized management. Before joining, ensure the PC client has a unique name on the network to avoid conflicts. This guide is designed for IT professionals, adhering to the principles of Experience, Expertise, Authoritativeness, and Trustworthiness (E-E-A-T).
Prerequisites Before Joining a Windows Domain
Ensure the following before starting. First, the PC client must be connected to the same network as the Domain Controller. Second, you need a domain user account with privileges to add computers to the domain. Third, the client’s DNS configuration must point to the domain’s DNS server. Therefore, verify this connectivity and configuration to ensure a smooth process.
Steps to Rename PC and Join Domain
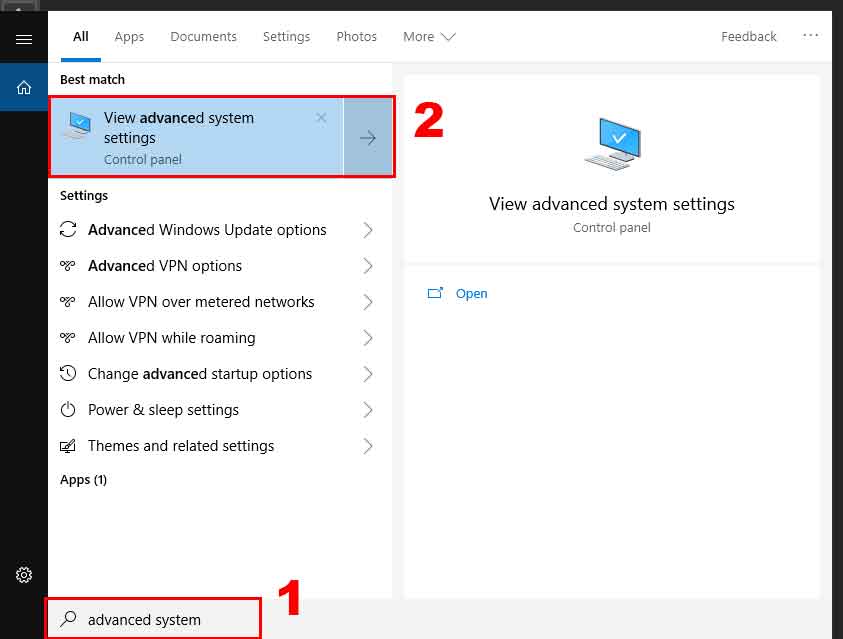
- Open Advanced System Settings. Type “advanced system” in the Windows search box, then select View advanced system settings.
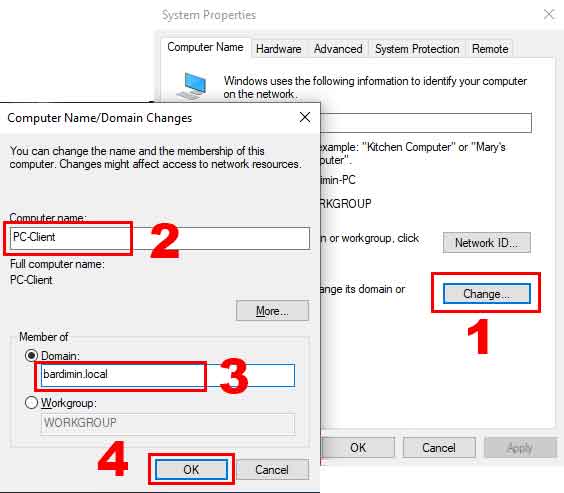
- Change Computer Name and Join Domain. In the Computer Name tab, click the Change button. In the new window, enter a unique name for the PC (example: PC-MARKETING01). Next, select the Domain option and type the target domain name (example: corporate.local). Click OK to continue.
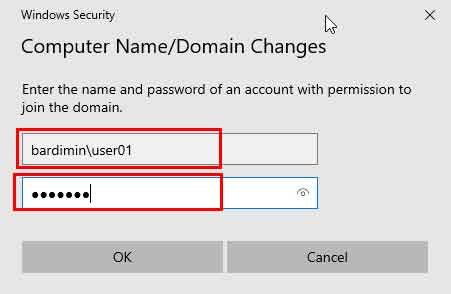
- Authenticate with Domain Credentials. The system will prompt for credentials from an authorized domain account. Use the format DOMAIN-NAME\Username (example: CORPORATE\admin.john) or the UPN format username@domain.local. Enter the corresponding password. Then, click OK.
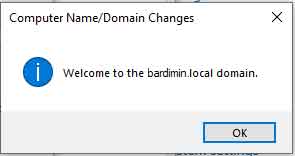
- Restart the Computer. If successful, a “Welcome to the domain” message will appear. Click OK, then follow the prompt to restart the PC. After restarting, log in using a domain account to verify domain membership.
Troubleshooting and Important Tips
If the Windows domain join process fails, check several things. Ensure the network connection is stable and the Domain Controller server is active. Also verify that the typed domain name is correct. Furthermore, confirm the used account has the “Add workstations to domain” permission. You can refer to the official Microsoft troubleshooting guide for further analysis.
For security and stability tips, use a consistent PC naming convention. This makes identification easier in large networks. Always document every computer joined to the domain. Consequently, network audit and maintenance processes become more structured.
Expert Note: The domain join process will change the local user profile. Therefore, back up important data before starting. This procedure applies to Windows 10 and Windows 11, and is compatible with the latest Windows Server versions.
By following the steps above, the Windows domain join process can be completed efficiently. A successful PC client integration is the foundation for building a reliable and secure domain network. For more in-depth information on Active Directory management, you can visit the official Microsoft documentation.