Google Photos offers a free 15 GB storage quota shared across its services, prompting users to manage their space efficiently. This article details two primary methods for downloading photos and videos from Google Photos to a PC: a manual selection via the web interface and a full export using Google Takeout. This guide is essential for digital professionals, photographers, and any user looking to safeguard their memories.
The Google Photos service provides convinient cloud storage for your pictures and videos. However, the free tier is limited to 15 GB, shared with Gmail and Google Drive. Consequently, many users need to download photos and videos from Google Photos to their PC to free up space or create a local backup.
This article explains two core methods in detail. The first is a selective approach using the web interface for specific files. The second is a comprehensive process using Google Takeout for a complete data export. This guide is tailored for a range of users, from IT professionals to gamers managing their digital libraries.
Why You Should Download Photos from Google Photos
Several key reasons make downloading your photos and videos to a PC a smart move:
- Storage Quota Management: The 15 GB quota fills up quickly for active users. Downloading files to your PC allows you to delete them from the cloud and reclaim space.
- Redundant Data Backup: Relying on a single storage location is risky. A local PC backup adds an extra security layer in case of Google account issues.
- Offline Access: Files stored on your PC are accessible anytime without an internet connection, useful for presentations or editing.
- Preserving Original Quality: While Google Photos offered unlimited high-quality storage until 2021, all media now counts against your quota. Downloading ensures you retain the original files.
How to Download Specific Files from Google Photos
This method is ideal when you only need to save a few specific photos or videos. The process is done directly through the Google Photos web interface and is straightforward. Follow these detailed steps:
- Open your browser and go to photos.google.com. Log in with your Google account if you haven’t.
- Use the search feature or navigate through albums to find the photos or videos you want to download. You can view them in grid or list layout.
- To select a single file, click on it. To select multiple files, hover your cursor over a photo and click the checkmark icon that appears in the top-left corner. Repeat for all desired files.
- Once selection is complete, click the three vertical dots (More options) in the top-right corner of the screen. From the dropdown menu, choose the “Download” option.
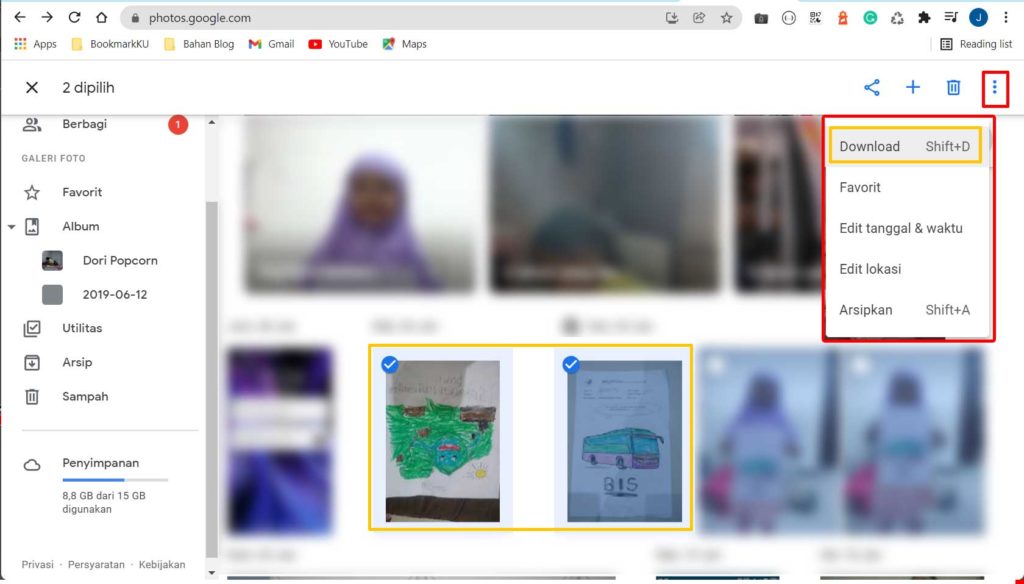
The system will compress the selected files into a single ZIP archive if there are multiple. However, if it’s just one file, you’ll get the original file format. The download will then start based on your browser’s settings. Ensure you choose an appropriate destination folder on your PC.
Important Note: This method has limitations. Google Photos limits the number of files you can download at once. If you select too many, the system might split them into multiple ZIP archives. Additionally, metadata like capture date and location remains intact within the files.
How to Download All Photos Using Google Takeout
Google Takeout is Google’s official, powerful data export tool. It enables you to perform a complete backup of Google Photos to your PC, including all albums, photos, and videos. This process is more involved but thorough.
- Visit takeout.google.com. Make sure you are logged into the correct Google account.
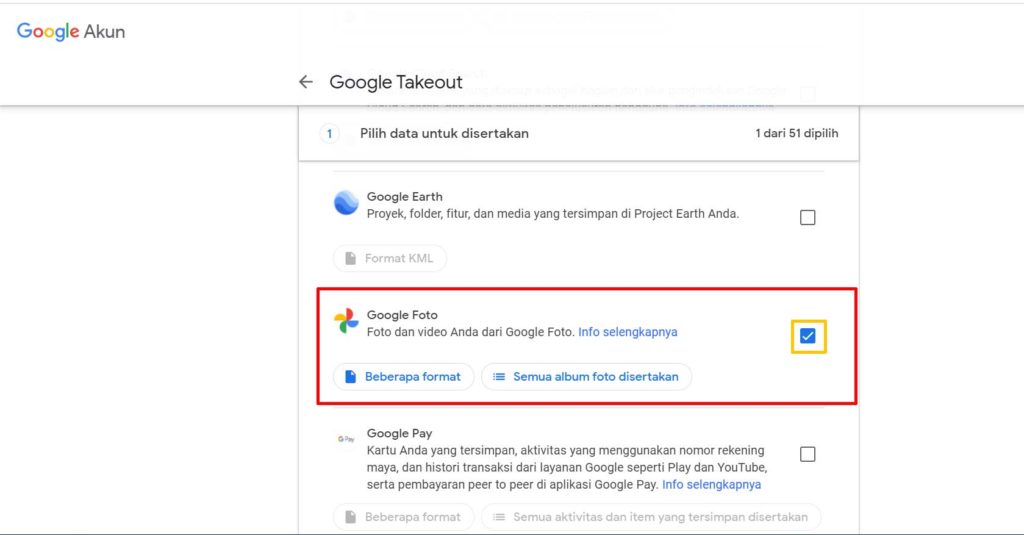
- On the main page, you’ll see a list of all Google services. For efficiency, first click the “Deselect all” button. Then, scroll and check only the “Google Photos” option.
- Click the “All photo albums included” button that appears. Here you can choose to export all albums or select specific ones. For a full backup, select “All albums” and then click “OK”.
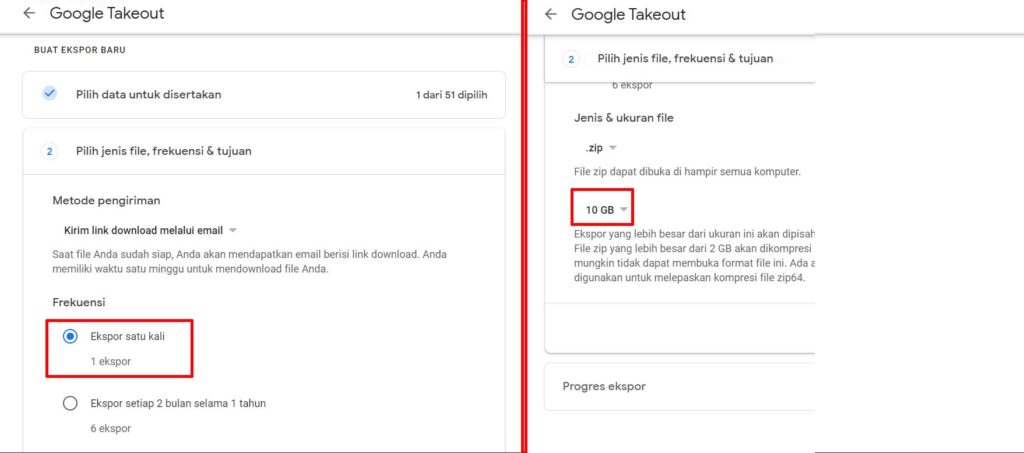
- Click “Next step” to proceed to export settings. Here you will find several important options:
- Export Frequency: Choose “Export once” for a one-time backup.
- File Format: Choose .zip or .tgz. The .zip format is more compatible with Windows.
- Archive Size: Choose the maximum size per file (1GB, 2GB, 4GB, etc.). Select 2GB for a balance between file count and size.
- Delivery Method: Choose “Send download link via email”.
- After configuring, click the “Create export” button. The archive creation process will begin.
The export process can take from a few minutes to several days, depending on your data volume. Google will send a notification email to the associated account. The download link in the email is active for only 7 days. Therefore, download the archive to your PC promptly after receiving the email.
Advantages of Using Google Takeout
- Complete Export: Retrieves all photos and videos, even those removed from albums but still in the trash.
- Preserved Metadata: EXIF information like date, GPS location, and camera settings remains intact.
- Organized Structure: Files are exported with a folder structure based on albums and dates.
- Original Format: Files are downloaded in the original quality and format they were uploaded in.
Essential Tips After Downloading
- Verify Files: After downloading, open a few random files to ensure they are not corrupted.
- Organize on PC: Create a clear folder structure on your PC based on date, event, or category.
- Additional Backup: Store files in at least two separate physical locations (e.g., PC and external hard drive).
- Remove from Cloud: After successful backup verification, you can delete files from Google Photos to free up quota.
- Regular Updates: Schedule a Google Takeout photo export periodically, every 6 or 12 months.
By following this guide, you now master two methods for downloading all photos from Google Photos to your computer. The selective method suits daily needs, while Google Takeout is the best solution for a complete backup. Always prioritize the security of your digital data by performing regular backups.