Managing storage by creating partitions in Windows is a crucial step to separate the operating system from personal data. This step-by-step guide explains how to divide a drive using the built-in Disk Management tool and relocate default folders for enhanced security and efficiency.
When buying a new laptop, you often find only a single C: drive partition, despite having a large storage capacity. Using just one partition doesn’t directly harm Windows performance. However, this approach carries significant data security risks. Applying the correct method to partition a Windows drive will protect your data if the system needs reinstalling due to failure.
Benefits of Creating Partitions in Windows
Separating the system partition (C:) from the data partition (e.g., D:) offers several advantages. The primary benefit is data isolation. If Windows encounters a serious issue, you can format the C: drive without fear of losing documents, photos, or work files. The reinstallation process becomes faster and cleaner. Furthermore, file management becomes more organized. You can also easily back up specific data partitions.

How to Create a New Partition in Windows 10 and 11
You don’t need third-party software to split a drive. Disk Management is Windows’ powerful built-in tool for this task. It’s available in Windows 7, 10, and 11. The process involves shrinking an existing volume and allocating the space into a new partition. Here are the practical steps.
Step-by-Step Guide to Partition with Disk Management
- Open Computer Management. Right-click the Start button and select “Computer Management”, or search via Windows Search.
- In the Computer Management window, select Disk Management from the left pane.
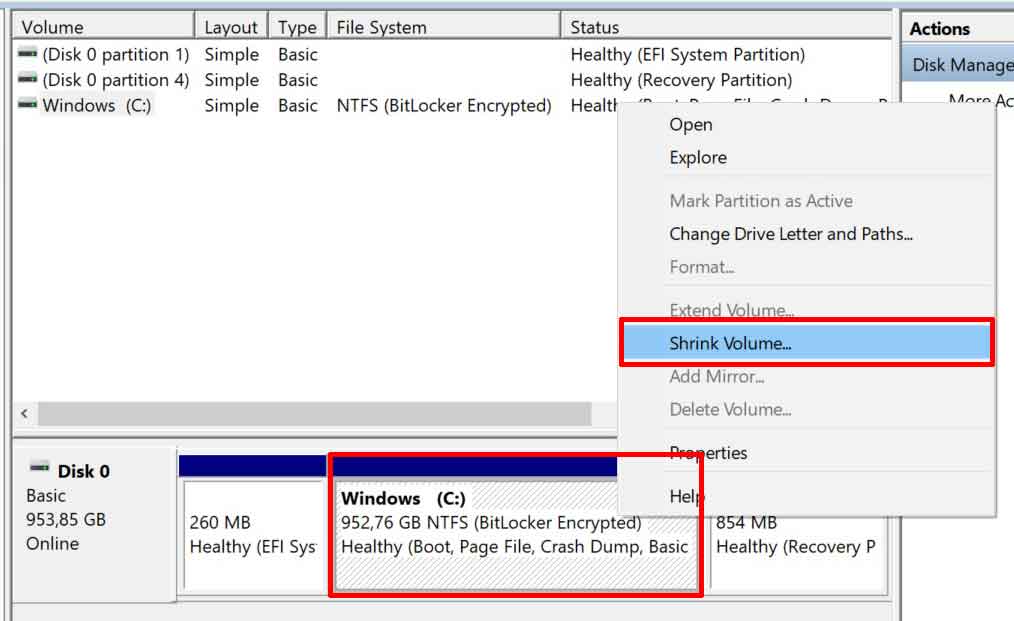
- Right-click on the Windows (C:) drive and select Shrink Volume.
- In the Shrink C: window, enter the amount of space to allocate for the new partition (in MB) in the field “Enter the amount of space to shrink in MB”. For example, for 100 GB, type 102400.
- Click Shrink. An “Unallocated” space will appear next to the C: drive.
- Right-click the Unallocated area and select New Simple Volume.
- Follow the wizard. Specify the volume size, assign a drive letter (e.g., D:), format with NTFS, and give it a label (e.g., “Data”).
- Click Finish. Your new partition will now appear in File Explorer.
Recommended Ideal C: Drive Partition Size
Determining the ideal Windows C drive partition size depends on usage. Here is a general guideline:
- 150-250 GB: Sufficient for Windows, office applications, and browsers. Suitable for standard work.
- 250-500 GB: Recommended for users installing many professional software like design or programming tools.
- 500 GB or more: Essential for gamers installing modern AAA titles, or creative content users like video editors. Remember, if using an SSD, ensure at least 15% free space for optimal performance.
Relocating Default Folders to the New Partition
After creating the data partition, the next smart step is to redirect the location of system folders like Documents, Pictures, and Downloads. This ensures such data is automatically saved to the D: drive.
- On the new drive (D:), create folders named “Documents”, “Pictures”, “Downloads”, etc.
- Open File Explorer, right-click the “Documents” folder in Quick Access, then select Properties.
- Go to the Location tab. Click the Move button.
- Navigate to the “Documents” folder you created on drive D:, then select Select Folder.
- Click Apply. Confirm to move all existing files to the new location.
- Repeat the process for the Downloads, Pictures, Music, and Videos folders.
Expert Tip: This process of moving default folders also serves as a simple backup strategy. If Windows corrupts, your important data is already safe on a separate partition. Always ensure your data partition is also backed up regularly to external media or cloud.
By following this guide, you have correctly applied the method to partition a Windows drive. An organized storage structure enhances data security and simplifies system maintenance. This practice applies to both Windows 10 and Windows 11. For official information on disk management, you can refer to the official Microsoft support site.