Understanding BIOS and UEFI is a critical foundation for computer system optimization. This article provides an in-depth explanation of architectural differences, UEFI advantages like Secure Boot, and a complete technical guide to convert from Legacy BIOS to UEFI without data loss. Designed for technicians, IT professionals, and advanced users.
What Are BIOS and UEFI? Understanding Firmware Architecture
BIOS (Basic Input/Output System) and UEFI (Unified Extensible Firmware Interface) are firmware that act as a critical bridge between computer hardware and the operating system. Both run first when power is turned on, in a stage called the pre-boot environment. Although thier functions are similar, their architectures and capabilities are vastly different.
BIOS is an legacy system developed in the 1970s. It resides on a ROM (Read-Only Memory) or flash memory chip on the motherboard. BIOS operates in 16-bit real mode and uses the Master Boot Record (MBR) to manage partition information. Main limitations of BIOS include a text-based interface (POST), a maximum storage support of 2.2 TB, and only 4 primary partitions.
Conversely, UEFI is a modern firmware standard introduced around 2005. UEFI was designed to overcome all of BIOS’s limitations. It operates in 32 or 64-bit mode, uses the GPT (GUID Partition Table) scheme, and stores boot data in files with the .efi extension on a special partition called the EFI System Partition (ESP). The fundamental difference between BIOS and UEFI lies in this architecture, which paves the way for advanced features.
In-Depth Comparison Table: BIOS vs UEFI
| Aspect | BIOS (Legacy) | UEFI (Modern) |
|---|---|---|
| Architecture & Mode | 16-bit, Real Mode | 32/64-bit, Protected Mode |
| User Interface | Text (POST), keyboard navigation | Graphical (GUI), mouse & touch support |
| Partition Table | MBR (Master Boot Record) | GPT (GUID Partition Table) |
| Partition Limits | 4 primary partitions, max 2.2 TB per disk | 128 partitions in Windows, up to 9.4 ZB |
| Boot Time | Relatively slower | Faster with Fast Boot technology |
| Security | Minimal, vulnerable to bootkits | Secure Boot, code signature validation |
| Network Support | None | Present (PXE, remote firmware update) |
| Diagnostic Capabilities | Limited | Comprehensive with built-in tools |
Analysis of UEFI Advantages: More Than Just a BIOS Replacement
UEFI arrived not merely as a replacement, but as a firmware revolution. Here is a deep analysis of its advantages:
- Secure Boot and System Integrity: The Secure Boot feature is a security pillar of UEFI. It ensures only operating systems and drivers with trusted digital signatures are loaded during boot. This effectively prevents rootkits and bootkits that attack the firmware level. Source: Microsoft.
- Scalability and Future Compatibility: With GPT support, UEFI eliminates disk capacity limitations. Moreover, UEFI’s modular architecture allows the development of drivers and firmware applications (UEFI apps) independent of the operating system.
- Better Management and Maintenance: UEFI provides a rich setup interface and easier firmware updates via the operating system. Some implementations even have remote management capabilities for IT administrators.
- Mandatory Requirement for Latest Technologies: Windows 11 officially requires a system with UEFI firmware and active Secure Boot. Similarly, modern storage technologies like disks >2.2 TB and certain hardware RAID configurations require UEFI.
How to Verify Boot Mode in Windows: Diagnostic Steps
Before performing a conversion, verify your system’s status. Here are two main methods:
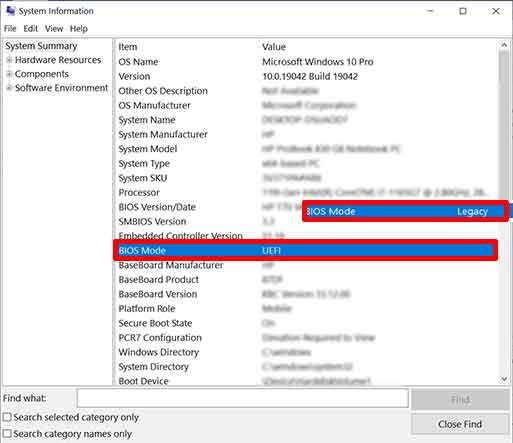
Method 1: Using System Information (msinfo32)
This method provides the most accurate information. Press Win + R, type msinfo32, then enter. Look for the “BIOS Mode” row. The value UEFI or Legacy will be displayed. This information is crucial for deciding the next steps.
Method 2: Via Disk Management
Open Disk Management (right-click the Start menu). Look at your system disk. If there is a partition named “EFI System Partition” (small size, typically 100-500 MB), then the system is running in UEFI mode. If not, and you see a “System Reserved” partition, it is likely using Legacy BIOS with MBR.
Guide to Convert from Legacy BIOS to UEFI Without Data Loss
The conversion process involves two major changes: changing the partition scheme from MBR to GPT, and changing the firmware settings. Windows 10 (v1703+) and Windows 11 provide the built-in tool mbr2gpt.exe. Backup important data before starting.
Phase 1: Validate and Convert Partitions with MBR2GPT
- Open Command Prompt or PowerShell as Administrator.
- Validate the disk first with the command:
mbr2gpt /validate /disk:0 /allowFullOS
The/disk:0parameter points to the system disk. Change the number if needed. - If validation is successful (Validation completed successfully), run the conversion command:
mbr2gpt /convert /disk:0 /allowFullOS
This process will create a new EFI (ESP) partition and convert MBR to GPT without disturbing data.

Phase 2: Configure Firmware for UEFI Mode
- Restart the computer and enter firmware setup (press Del, F2, F10, or Esc during boot).
- Look for a setting named “Boot Mode”, “UEFI/Legacy Boot”, or similar. Change this option from “Legacy” or “CSM” to “UEFI Only”.
- Disable the Compatibility Support Module (CSM) if present. This step is crucial to fully activate Secure Boot.
- Save changes and exit. The system will reboot.
After configuration, Windows will boot via the UEFI path. Verify again in System Information. You have now successfully changed from BIOS to UEFI and can enable features like Secure Boot from the firmware setup.
Conclusion and Practical Recommendations
Migrating from BIOS to UEFI is a highly recommended system upgrade step. Its bennefits include enhanced security, compatibility with new hardware, and better boot performance. For professionals and technicians, understanding the difference between BIOS and UEFI and mastering the conversion process is an essential skill. Always refer to official motherboard and operating system documentation for the most accurate instructions.