Learn how to enable auto login in Windows 11 without a password by disabling Windows Hello and configuring netplwiz. This technical guide provides detailed steps, security considerations, and troubleshooting tips for professionals, technicians, and gamers who want faster system access.
Every time you start a computer running Windows 11, you typically need to enter a password, PIN, or another authentication method like fingerprint or facial recognition. These methods protect your data from unauthorized access. However, in specific environments, such as a personal home computer used only by you or a dedicated device like a lab server, automatic login can save time and speed up booting. This guide explains how to enable auto login in Windows 11, including technical details, security trade-offs, and solutions for common issues.
Why Consider Auto Login?
Auto login eliminates the need for interaction after boot, taking you directly to the desktop. This is useful for kiosk-mode devices, limited-access public computers, or users who do not store sensitive data. However, remember that this feature lowers security. Only enable auto login if you are certain that no unauthorized persons can physically access your device. For multi-user environments or devices with valuable data, stick with Windows Hello or strong passwords.
Auto login speeds up access but removes the first layer of security. Assess the risks before implementing it.
Prerequisites: Understand Your Account Type
Windows 11 supports two account types: Microsoft Account (connected online) and Local Account. The auto login process differs slightly because a Microsoft Account requires stored credentials that stay synced. This guide works for both, as long as you have a valid password. You must have administrator rights to change these settings. Note that Microsoft Accounts use cloud-based authentication, so the locally stored password must match the online credentials. If you use two-factor authentication (2FA), auto login may fail because Windows will request an additional verification code.
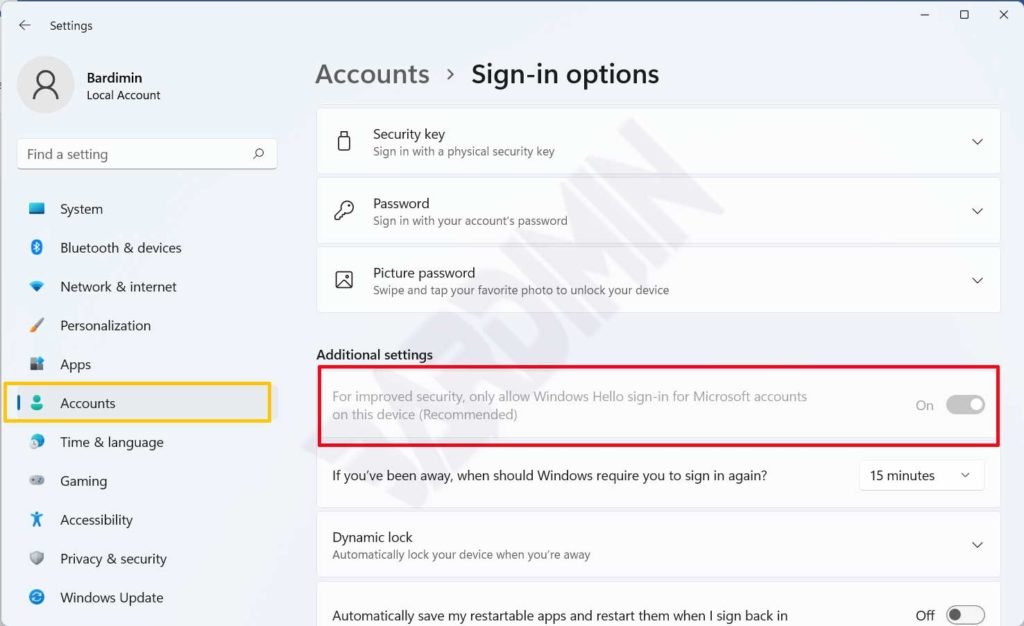
Step 1: Disable Windows Hello Sign-in
Windows 11 defaults to Windows Hello as the primary sign-in method, including PIN, facial recognition, or fingerprint. This feature is designed to replace traditional passwords with faster, more secure authentication. However, to enable password based auto login, you must turn off Windows Hello first. Windows Hello overrides the legacy login mechanism used by netplwiz. Follow these steps:
- Open Settings by pressing
Win + I. - Go to Accounts > Sign-in options.
- Under Windows Hello, you will see options like PIN, facial recognition, etc. Click each one and select Remove if already set up. If the Windows Hello toggle is greyed out, proceed to the substeps below.
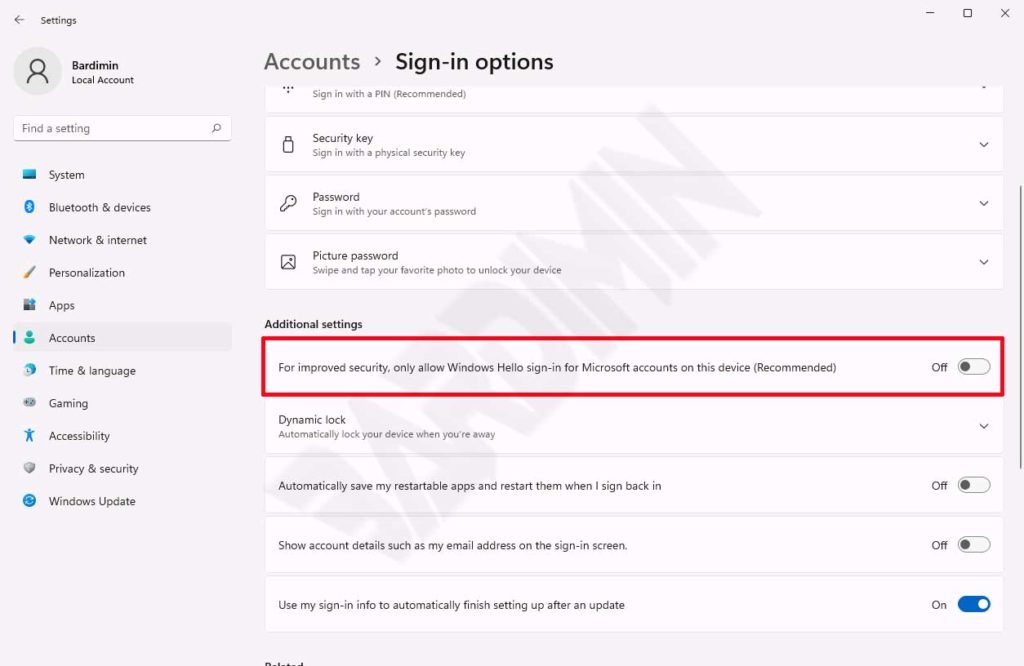
Fixing the Greyed-Out Windows Hello Toggle
The Windows Hello toggle often appears greyed out because the system requires a PIN as a fallback method. This is a security measure to prevent you from being locked out. To resolve this, you must create a temporary PIN, then disable it afterward.
- Click Set up under the PIN option, enter your account password, and create a new PIN (temporary). This PIN will only be used during this process.
- After the PIN is created, sign out or restart your computer. This ensures all changes take effect.
- Log back in using the new PIN, then navigate again to Settings > Accounts > Sign-in options. Now the Windows Hello toggle should be active; slide it to the left to turn it off. Once disabled, the PIN is automatically removed because it is part of Windows Hello.
- After turning off the toggle, ensure Windows Hello is completely disabled. You may want to restart once more to clear any lingering configurations.
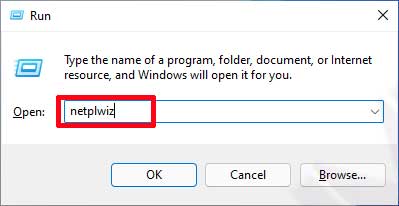
Step 2: Configure Auto Login with netplwiz
With Windows Hello turned off, you can use the classic netplwiz tool to set up automatic login. This tool has been around since Windows 7 and still works perfectly in Windows 11. Technically, netplwiz modifies the registry at HKLM\SOFTWARE\Microsoft\Windows NT\CurrentVersion\Winlogon by adding or updating the values AutoAdminLogon, DefaultUserName, and DefaultPassword. These entries tell Windows to bypass the login screen.
- Press
Win + R, type netplwiz, and hit Enter.
- In the User Accounts window, select the account you want to use for automatic login. Make sure this account has administrator privileges if you plan to make further system changes.
- Uncheck the option “Users must enter a user name and password to use this computer”. This setting controls whether Windows prompts for credentials at startup.
- Click Apply. A dialog box will appear asking for the current account password. Enter it correctly for a Microsoft Account, use your Microsoft account password; for a local account, use the local password. Important: if you enter the wrong password, auto login will fail and you might be locked out.
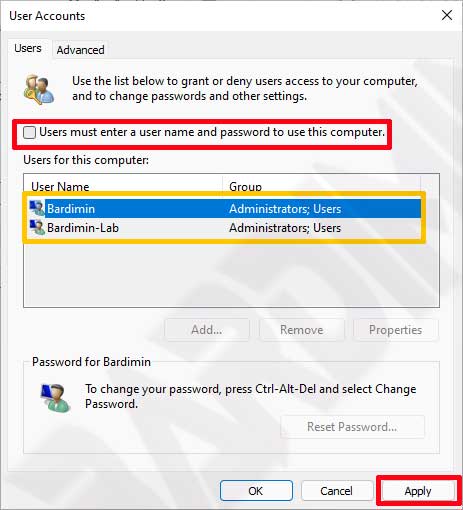
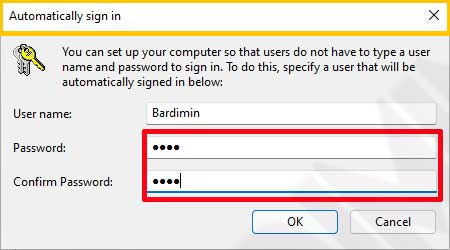
- Click OK to save the settings. Restart your computer to test the result. After the restart, you should be taken directly to the desktop without any password prompt.
Verification and Testing
After clicking OK, restart your PC. If auto login works, you will see the desktop immediately. If you are still prompted for a password, double-check that Windows Hello is completely off and that no group policy interferes. You can also verify the registry: navigate to HKLM\SOFTWARE\Microsoft\Windows NT\CurrentVersion\Winlogon and ensure AutoAdminLogon is set to “1” and DefaultPassword exists with the correct password. Be cautious when editing the registry; mistakes can destabilize your system.
Security Considerations and Alternatives
Enabling auto login stores your password in an encrypted form in the registry. While Windows protects it reasonably well, any user with administrative access can easily retrieve the credentials. Physical risk remains: if your laptop is stolen, the thief gains immediate access to all your data. For users who want convenience without sacrificing security, consider these alternatives:
- Windows Hello Dynamic Lock: Automatically locks your PC when a paired Bluetooth device (e.g., your phone) moves out of range. This offers a balance between speed and security.
- Picture Password: Use gestures on a photo instead of a PIN, ideal for touchscreen devices.
- Fast Startup with BitLocker: Full encryption with quick boot, but still requires initial authentication. BitLocker protects data even if the hard drive is removed.
- Credential Manager: For specific scenarios, you can store network credentials without compromising local login security.
For corporate environments or users handling sensitive data, avoid auto login. Instead, use group policies to enforce stronger security requirements, such as complex passwords and login auditing.
Microsoft Security Recommendations
For more details, refer to the official Microsoft documentation on Windows Hello.
Troubleshooting: Auto Login Not Working
Some users find that after following the steps, Windows still asks for a PIN or password. Here are common causes and detailed solutions:
- Windows Hello still active: Revisit Settings > Accounts > Sign-in options and ensure every Windows Hello method (PIN, facial, fingerprint) is removed. Sometimes residual data remains; you can delete the contents of
C:\Windows\System32\WinBioDatabase(requires admin rights) to clear biometric data. - Microsoft Account with two-factor authentication: 2FA overrides auto login. Temporarily disable two-factor authentication via your Microsoft account website. Once auto login works, you can re-enable it, but auto login may fail again.
- Group Policy interference: If your PC is domain-joined, group policies might override local settings. Check
gpedit.mscunder Computer Configuration > Administrative Templates > System > Logon. Ensure policies like “Always use custom logon background” are not blocking auto login. - Incorrect password stored: Repeat the netplwiz steps and verify the password. If you recently changed your password, update it in netplwiz as well.
- Registry corruption: If all else fails, you can set auto login directly via the registry. Open
regedit, go toHKLM\SOFTWARE\Microsoft\Windows NT\CurrentVersion\Winlogon, setAutoAdminLogonto “1”,DefaultUserNameto your username, and create a new string valueDefaultPasswordwith your password. This method is not recommended for inexperienced users due to the risk of errors.
How to Revert to Normal Settings
If you later decide to disable auto login and require a password again, simply reopen netplwiz, recheck the box “Users must enter a user name and password”, and click Apply. This removes the DefaultPassword from the registry and sets AutoAdminLogon back to “0”. You can also re-enable Windows Hello by going to Settings > Accounts > Sign-in options and setting up a PIN or biometric method again.
Conclusion
Seting up auto login in Windows 11 is straightforward once you disable Windows Hello and configure netplwiz. However, you must base this decision on a risk analysis of your environment. For home users with no sensitive data, this feature significantly speeds up access. For professionals and technicians managing multiple devices, ensure you have adequate security policies in place before enabling it. With proper technical understanding, you can optimize your Windows 11 experience without losing control over your system.
If you encounter technical difficulties, refer to official Microsoft documentation or contact support. Always back up important data before making system configuration changes.