Is your AC underperforming and not cooling as it should? The cause could be freon levels that are no longer up to standard. Understanding the correct how to recharge AC freon is a valuable skill to keep your cooling unit performing optimally and avoid more serious damage.
Freon, or refrigerant, is the lifeblood of the cooling system. Its level must always be correct. Too little will cause the evaporator to freeze and make the compressor work too hard. Conversely, too much will overload the compressor and reduce efficiency. Remember, freon in a sealed system should not decrease. If a drop occurs, it indicates a leak that must be found and repaired before recharging.
Essentially, the process of how to recharge AC freon requires precision and the right tools. This process involves checking pressure, monitoring electrical current (amps), and matching the type of freon used by your AC unit.
Essential Tools and Materials to Prepare
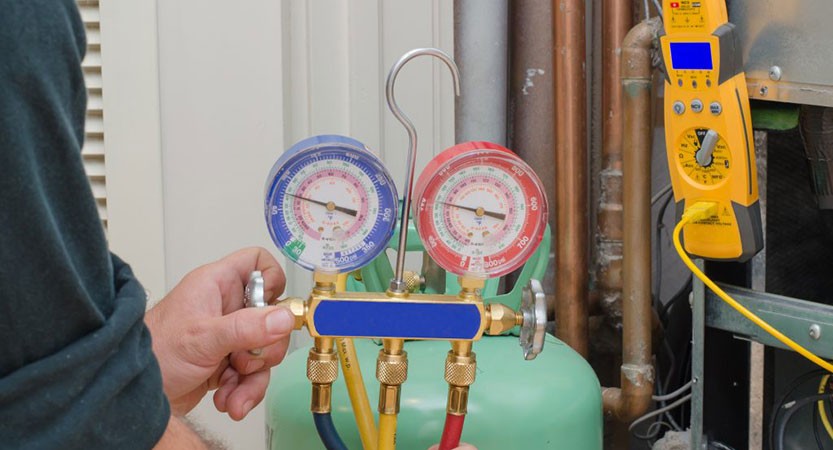
- Manifold Gauge Set: The main tool for measuring high pressure and low pressure in the system.
- Clamp Meter (Amp Clamp): To measure the amount of electrical current flowing to the compressor, as an indicator of workload.
- Screwdriver Set & Adjustable Wrench: For opening panels and tightening connections.
- Refrigerant (Freon): Ensure the type matches your AC unit’s specifications (R32, R410A, or R22 for older units). Note: R22 is phased out and replaced by more eco-friendly refrigerants like R32.
- Safety Gloves and Protective Glasses for safe handling.
Steps to Safely Recharge Your AC Freon
Follow these systematic steps to ensure the recharge is done correctly.
1. Preparation and Initial Checks
Turn on the AC in cooling mode at the lowest temperature and highest fan speed. Let the unit run for several minutes before checking the pressure.
2. Connecting the Manifold Gauge
Connect the blue hose from the manifold to the low-pressure service valve (suction/low side), usually located on the outdoor unit. Connect the red hose to the high-pressure port (if needed for diagnosis), and the yellow hose to the refrigerant tank. Ensure all connections are locked securely.
3. Reading Pressure and Current
Once connected, read the pressure on the gauge (psi) and compare it to the standard for the ambient temperature. As a general reference (room temp ~27°C / 80°F):
- R22: 57 – 84 psig (Low Side)
- R32 & R410A: 120 – 160 psig (Low Side)
Also, attach the clamp meter to the compressor’s power cable to monitor the current (amps) listed on the outdoor unit’s nameplate.
4. The Freon Recharging Process
If the pressure is below standard, begin recharging. Slowly open the valve on the refrigerant tank and the yellow hose valve on the manifold. Refrigerant will enter the system. Proceed gradually while continuously monitoring two key parameters:
- Pressure: Increase until it reaches the normal range.
- Current (Amps): Do not exceed the maximum amperage listed on the compressor’s nameplate.
Pro Tip: Stop recharging if the amperage is approaching its maximum limit, even if the ideal pressure hasn’t been reached. Forcing amperage above the limit can cause the compressor to overload and fail.
5. Finalization and Final Check
Once pressure and amperage stabilize within the proper range, tightly close the valves on the refrigerant tank and manifold. Quickly disconnect the hose from the service valve to minimize refrigerant loss. Recheck AC performance: the output air should feel cold and dry, with no abnormal sounds from the compressor.
The process of how to recharge AC freon requires practice and caution. If unsure, always hire a certified AC technician. They have complete tools and in-depth knowledge to handle refrigerant and detect more complex system issues, such as leaks. For more detailed technical information on refrigerant standards, you can refer to official AC manufacturer websites or relevant bodies like ASHRAE.