Do you want to migrate your physical operating system into a virtual machine quickly and efficiently?
A physical machine is a computer that runs an operating system and applications directly on its hardware. A virtual machine is a virtual computer that runs on top of a physical machine and has its operating system and applications.
A hypervisor is a program that lets you create and manage virtual machines on physical machines.
There are many reasons why you might want to convert a physical machine to a virtual machine, such as:
- Save on hardware, electricity, and space costs.
- Make backup, restore, and migration of virtual machines easier and faster.
- Run different operating systems and applications on the same virtual machine.
- Test and develop operating systems and applications on virtual machines without disrupting physical machines.
Advantages of Using Virtual Machines
Before we begin, let’s discuss why converting a physical machine into a virtual machine can be a wise move. There are several benefits that you can enjoy:
- Flexibility: Virtual machines allow you to run physical operating systems in an isolated environment, giving you flexibility in testing, developing, and managing applications and systems.
- Efficiency: By reducing the amount of physical hardware required, you can save costs and energy, and speed up disaster recovery.
- Scalability: Virtual machines allow you to easily increase or decrease the resources allocated to virtual machines, thereby increasing scalability and operational efficiency.
How to Convert a Physical Machine to a Virtual Machine
There are several ways to convert a physical machine to a virtual machine, depending on the hypervisor you are using. In this article, we will discuss the most popular ways to convert a physical machine to a virtual machine by using:
- Hyper-V
- VirtualBox
How to Convert a Physical Machine to a Hyper-V Virtual Machine
Hyper-V is a hypervisor included in Windows Server and Windows 11. Hyper-V lets you create and run virtual machines on Windows.
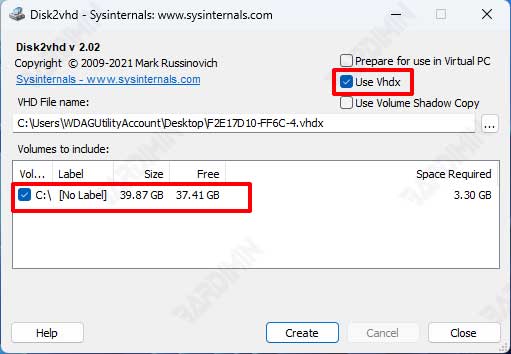
To convert a physical machine to a Hyper-V virtual machine, you can use a free tool called Disk2vhd. Disk2vhd is a tool that can create virtual hard disk files (VHD or VHDX) from physical machine disks or partitions. This virtual hard disk file can be used as a hard disk for Hyper-V virtual machines.
Here are the steps to convert a physical machine to a Hyper-V virtual machine with Disk2vhd:
- Download Disk2vhd from the Microsoft website and extract the zip file to your desired folder.
- Run “Disk2vhd.exe” as administrator on the physical machine you want to convert.
- Select the disk or partition you want to convert to a virtual hard disk file. Make sure you select the system partition and boot partition if they exist.
- Specify the location and file name of the virtual hard disk you want to create. You can choose VHD or VHDX format according to your preference. VHDs are more compatible with other hypervisors, while VHDXs have additional features such as a maximum size of 64 TB and data corruption protection.
- Click “Create” button to start the conversion process. This process can take a few minutes to a few hours, depending on the size of the disk or partition you are converting.

- After the conversion process is complete, copy the created virtual hard disk files to the physical machine running Hyper-V or to a shared storage location if you are using Hyper-V Server or Hyper-V cluster.
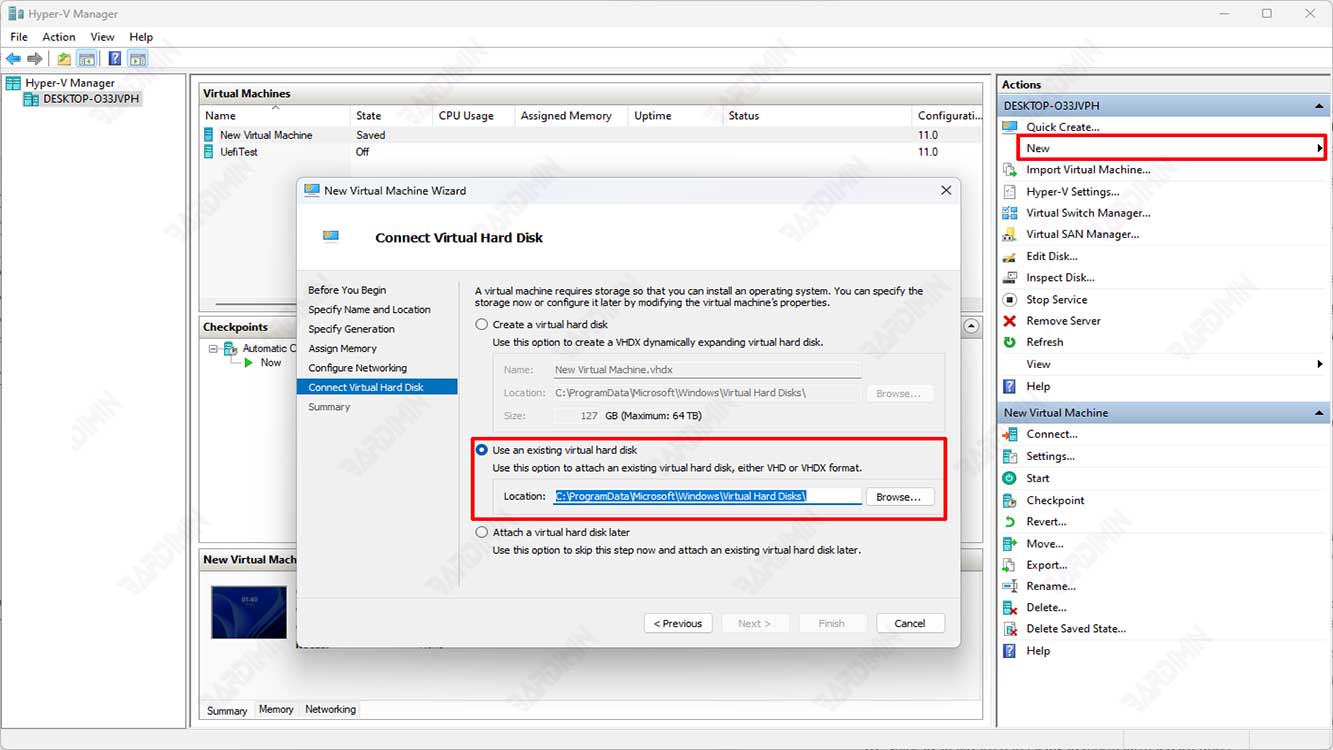
- Open “Hyper-V Manager” on the physical machine running Hyper-V or connected to Hyper-V Server or Hyper-V cluster via Remote Desktop or PowerShell.
- Click “New > Virtual Machine” to open the “New Virtual Machine Wizard”.

- Follow the wizard instructions to create a new virtual machine with specifications that match the original physical machine. On the “Connect Virtual Hard Disk” page, select the “Use an existing virtual hard disk” option and navigate to the virtual hard disk file you copied earlier.
- Complete the wizard and run your new virtual machine.
How to Convert a Physical Machine to a VirtualBox Virtual Machine
VirtualBox is a free and open-source hypervisor that can run on Windows, Linux, Mac OS X, and Solaris. VirtualBox allows you to create and run virtual machines from various operating systems. To convert a physical machine to a VirtualBox virtual machine, you can use a free tool called VMware vCenter Converter Standalone.
VMware vCenter Converter Standalone is a tool that can convert a physical machine or virtual machine from another format to the VMware format. This VMware format can be used as a hard disk for VirtualBox virtual machines.
Here are the steps to convert a physical machine to a VirtualBox virtual machine with VMware vCenter Converter Standalone:
- Download VMware vCenter Converter Standalone from the VMware website and install it on the physical machine you want to convert or on another machine connected to the same network.
- Run “VMware vCenter Converter Standalone” as administrator and click “Convert machine” on the toolbar.
- On the “Source System” page, select “Powered-on machine” as the source type and select “This local machine” or “A remote machine” depending on the location of the physical machine you want to convert. If you select “A remote machine”, you must enter credentials and network information to connect to that physical machine.
- On the “Destination System” page, select “VMware Workstation or other VMware virtual machine” as the destination type and select “VMware Workstation 10.x” or higher as the destination product. Specify the location and folder name for the virtual machine files to be created.
- On the “Options” page, you can adjust virtual machine settings such as CPU count, memory size, disk controller type, and disk partition you want to convert. You can also enable or disable features such as Installing VMware Tools, Customizing guest preferences, and Reconfigure destination virtual machine.
- Click “Finish” to start the conversion process. This process can take a few minutes to a few hours, depending on the size of the disk or partition you are converting.
- After the conversion process is complete, copy the created VM folder to the physical machine running VirtualBox or to a shared storage location if you are using VirtualBox on multiple machines.
- Open “VirtualBox” on the physical machine running VirtualBox, or connect to VirtualBox via Remote Desktop or SSH.
- Click “Machine > Add” and navigate to the “.vmx” file located inside the virtual machine folder you copied earlier. The “.vmx” file is a VMware virtual machine configuration file that can be read by VirtualBox.
- Click “Open” to add the virtual machine to the list of VirtualBox virtual machines. You may need to adjust virtual machine settings such as chipset type, boot mode, and network type according to your preferences.
- Run your new virtual machine.
Conclusion
Converting a physical machine into a virtual machine is a smart move to increase the flexibility, efficiency, and scalability of your IT environment. By following this guide, you can easily make the conversion without any problem. Remember to always back up your data before converting to avoid unwanted data loss.

