“Have you ever lost important files because your laptop was damaged or infected by a virus? Or accidentally delete work documents that have been worked on for hours? Don’t worry, Windows 11 has a handy solution called File History, an automatic backup feature that can save your data in minutes!”
Imagine you’re working on an important report all night, and suddenly, your laptop crashes, leaving all your work to disappear. Or family memories that have been stored for years suddenly corrupt without being opened. This annoying situation can be prevented by utilizing File History, a built-in feature of Windows 11 that is often forgotten but is very powerful!
This feature works like insurance for your data, automatically backing up important files to an external drive or network. Best of all, you can restore versions of files from the previous day, even deleted ones! In this guide, we’ll walk you step-by-step through how to enable and get the most out of File History in Windows 11. Starting from device preparation and optimal settings to how to recover files when the unexpected happens.
Preparation Before Enabling File History in Windows 11
Before enabling File History, make sure you have a compatible storage device ready to use. Here are the necessary preparations:
1. Required Devices
To use File History, you need one of the following storage options:
External Drive (USB Flash Drive or Portable Hard Drive)
- Minimum capacity: 2x the size of the data you want to back up (for example, if your data is 100GB, use a drive of 200GB or more).
- Drive format: Make sure it’s in NTFS format (FAT32 format doesn’t support large files).
- Speed: For faster backups, use an external SSD or USB 3.0/3.1.
Alternative: Network Attached Storage (NAS)
- If you want to back up over a network (for example, in the office or home with multiple devices).
- Make sure the PC is connected to the same network as the NAS.
2. Steps to Prepare the Storage Device
Before activating File History, perform the following preparations:
Formatting an external drive (if not NTFS)
- Plug the drive into your PC/laptop.
- Open File Explorer (Win + E), right-click the drive, and select “Format”.
- Select NTFS as the File System.
- Name the drive (optional), then click “Start”.
The format will erase all the data on the drive! Make sure you have backed up important files beforehand.
Ensuring a stable connection (if using a NAS)
- Make sure the NAS is connected to the same network as the PC.
- Open File Explorer, log in to Network, and make sure the NAS is detected.
- If required, log in with the NAS username & password.
How to Enable File History in Windows 11
Once the storage device is ready to use, the next step is to enable the File History feature in Windows 11. This feature allows the system to automatically back up your important files at regular intervals.
Steps to Enable File History
Here are the steps to enable File History in Windows 11:
Step 1: Open File History via Control Panel
- Click Start, then type and open Control Panel.
- Select the System and Security menu.
- Click File History.
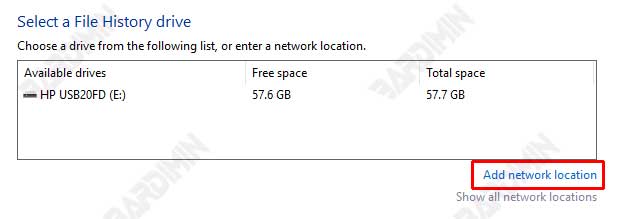
Step 2: Select a Storage Drive
- Connect the external drive to the computer if it is not already connected.
- The system will automatically detect the available drives.
- Click Turn On to enable the File History feature.

If you want to back up to a network device like NAS, click Select drive > Add network location and select the appropriate network address.
Additional Adjustments to File History
Once the feature is enabled, you can make additional settings to make the backup process more efficient and tailored to your needs.
Select the Folders You Want to Suggest or Exclude
By default, File History will back up user folders such as Documents, Pictures, Music, and Desktop. You can:
- Add another folder you want to back up.
- Exclude specific folders from being backed up by clicking Exclude folders.

Set Backup Frequency and Storage Length
- Click Advanced settings in the File History menu.
- Select a backup frequency from the time list, for example: Every 10 minutes, Every hour (default), Every 12 hours, etc.
- Specify how long the backup file will be stored, for example: Until the storage space is full, 1 month, 3 months, 1 year, or forever

It is recommended to back up files every 1 hour and keep the backup version for at least 3 months, depending on your storage space.
How to Recover Files with File History in Windows 11
When you accidentally delete important files or want to restore a previous version of a document, File History is a powerful solution. Here’s the full guide:
Step 1: Access the Restore Menu
- Open the folder where the original file was saved (for example, Documents or Pictures).
- Click the “Home” tab in File Explorer, and then select “History” (wall clock icon). Alternatively, you can also open it through Control Panel > File History > Restore personal files.
Step 2: Search for File Versions
- Use the panah hijau ( ◀ ▶ ) button to see backup berdasarkan tanggal.
- Click the “Preview” (eye icon) to check the contents of the file before recovering.
Step 3: Restore Process
- Select the file/folder you want to recover.
- Click “Restore” to return to the original location.
By default, the Restore process will replace old files that are in the same location. To avoid losing the latest version of your file, do the following:
- Right-click on the Restore button and select Restore to... This option allows you to choose a different location to save the restored version.
- Compare the size, date, or contents of the file first before making a replacement.
Conclusion
File History in Windows 11 is a practical and reliable solution to protect your important data from the risk of loss due to human error, system corruption, or malware attacks. By enabling this feature, you get automatic backups that work in the background without interrupting activities, as well as the ability to easily restore old versions of files, such as having a “time machine” for your data.
By applying this guide, you no longer have to worry about losing your work documents, family photos, or other critical files. One click of a backup today can save hours of work in the future!
“Don’t wait until the data is lost before you regret it! Enable File History right now, as backups are only useful if they are done before disaster strikes.”