Managing networks with VLAN (Virtual Local Area Network) on the Dell Networking X1000 Series is a crucial step to enhance network security and performance. This article provides a complete guide on how to configure VLAN on the Dell X1000 switch, covering VLAN creation, port assignment, and configuration saving. This tutorial is designed for technicians, IT professionals, and gamers seeking better network segmentation.
The Dell Networking X1000 Series switch is an affordable managed switch solution for small and medium businesses. This device offers enterprise-class control with a simple interface. Support for VLAN features allows you to perform logical network segmentation. This segmentation is very useful for separating data traffic, improving security, and optimizing network performance.
With the VLAN feature on the X1000 series, you can create separate virtual networks. Therefore, you can group devices based on function or department. Furthermore, VLAN configuration on this device is also relatively easy via the web GUI.
Preparation Before VLAN Configuration
Ensure you have administrative access to the Dell X1000 switch. Default login information is usually listed on the device label. However, for security, it’s better to use credentials you have changed. The common default IP address is 192.168.2.1. Make sure your computer is in the same subnet as the switch to access the web interface.
How to Create a VLAN on Dell X1000 Series
Follow these systematic steps to create a new VLAN on Dell X1000.
- Access the switch’s web interface by opening a browser and visiting the device’s IP address (e.g.,
http://192.168.2.1). Enter the username and password. - After logging in, navigate to the “Configure > VLAN” menu.
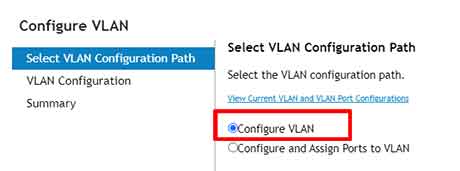
- In the window that appears, select the “Configure VLAN” option. Then, click the “Next” button to continue.
- To add a new VLAN, click the “+Add” button.
- Fill in the VLAN ID (a number between 1-4094) and a descriptive VLAN name in the “VLAN Name” field. Click “OK” to add.
- Click the “Next” button and proceed with “Apply” to save the newly created VLAN configuration.
Steps to Assign Switch Ports to a VLAN
After the VLAN is successfully created, the next step is to associate the switch’s physical ports with a specific VLAN ID. This process is called assigning ports to a VLAN.
- Still in the “Configure > VLAN” menu, select the “Configure and Assign Ports to VLAN” option. Then, click “Next”.
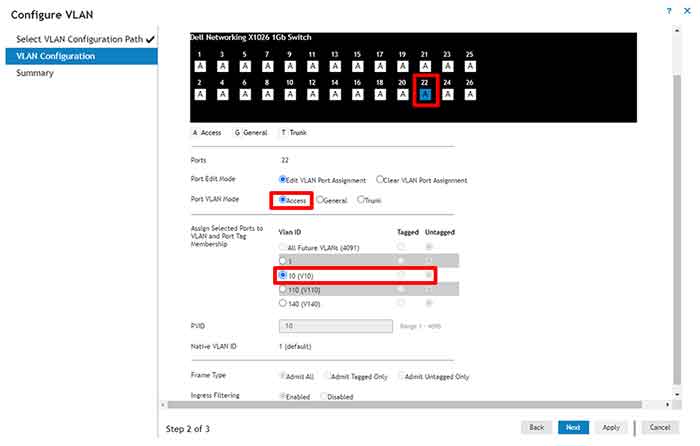
- Select the port or port group you want to configure by clicking its image.
- Set the “Port VLAN mode” to “Access”. Next, select the previously created VLAN ID from the dropdown menu. Click “Next”.
- Review your configuration and click “Apply” to apply the port-to-VLAN settings.
Saving VLAN Configuration to Startup Configuration
The configuration you have made is by default saved in the running-config. This configuration is temporary and will be lost if the device is restarted. Therefore, you must save it to the startup-config to make it permanent.
- Click the “Tools” icon (shaped like a gear) in the top right corner of the web interface.
- Select the “Save to Startup Configuration” option.
- Wait for the saving process to complete. After that, your VLAN configuration will remain active even if the switch is turned off or restarted.
For more information on the latest specifications and firmware, you can refer to the official Dell Networking X1000 Series support page.
By following this guide, you have successfully configured VLAN on the Dell Networking X1000 Series switch. VLAN configuration is very effective for separating office, lab, or gaming network traffic. Always remember to save the configuration to startup so your settings remain permanent.