This article provides an in-depth guide on how to convert MBR to GPT without data loss, solving Windows installation issues on modern UEFI systems. We will discuss the fundamental differences between MBR and GPT and present two practical conversion methods: using the GPT fdisk tool and the built-in Windows utility, MBR2GPT, ensuring a safe and smooth transition for technicians and advanced users.
Converting MBR to GPT is often necessary when installing modern operating systems like Windows 10 or 11 on devices with UEFI firmware. The MBR (Master Boot Record) partition scheme is an older standard with limitations, such as supporting disks only up to 2TB and a maximum of 4 primary partitions. In contrast, GPT (GUID Partition Table) is the newer generation partition standard that supports extremely large disk capacities, more partitions, and offers better data redundancy for enhanced security.
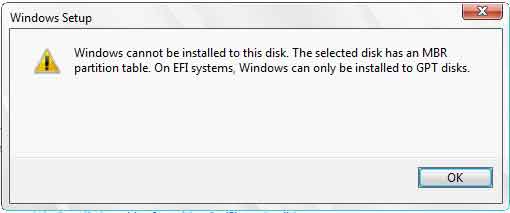
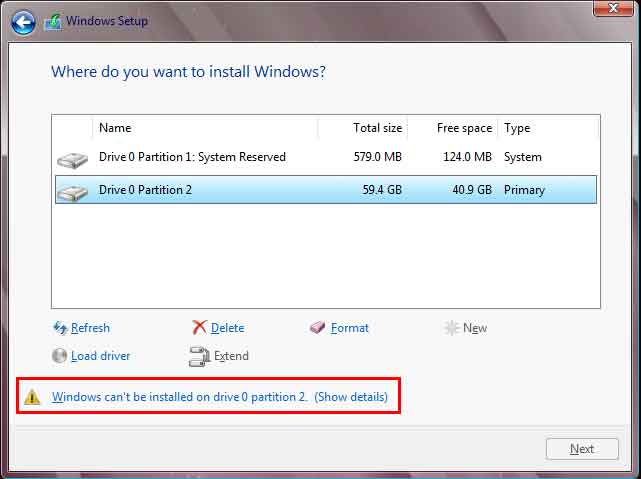
Therefore, when users attempt to install Windows on a UEFI-based computer using an MBR-partitioned disk, they encounter the error message: “Windows cannot be installed on this disk. The selected disk has an MBR partition table”. To resolve this, converting from MBR to GPT is required. However, this process must be performed carefully to avoid losing existing data.
Key Differences Between MBR and GPT
| Aspect | MBR (Master Boot Record) | GPT (GUID Partition Table) |
|---|---|---|
| Introduced | 1983 (IBM PC DOS 2.0) | Late 1990s (part of UEFI) |
| BIOS/UEFI Support | Legacy BIOS (CSM) | Modern UEFI (and BIOS with CSM) |
| Disk Capacity Limit | Max 2 TB | Up to 9.4 Zettabytes (ZB) |
| Number of Primary Partitions | Max 4 | Up to 128 (Windows standard) |
| Reliability & Security | Partition data stored in one location | Has multiple backups (CRC32), more corruption-resistant |
Important Note: Before starting the convert MBR to GPT process, it is highly recommended to back up important data to an external storage device. Also, ensure stable power during the process to prevent data corruption.
Method 1: Convert MBR to GPT Using GPT fdisk (gdisk)
This method is effective and can be performed directly from the Windows installation environment. GPT fdisk (gdisk) is a powerful open-source tool for manipulating partition tables. Here are the steps:
- Download the GPT fdisk utility from SourceForge. Extract the ZIP file and copy the folder containing
gdisk64.exe(for 64-bit systems) to your Windows installation flash drive. - Run the Windows installation process until you reach the partition selection screen and the MBR-related error message. On this screen, press Shift + F10 to open Command Prompt.
- Use the
notepadcommand to open Notepad. Then, from the File > Open menu, access your flash drive and navigate to thegdisk64.exefile. Right-click on the file and select “Run as administrator”. - In the gdisk window, type the number of the disk you want to convert (for example,
0for Disk 0). Then, press Y to begin scanning the partitions. - To convert, type
wand press Enter, then confirm withY. The convert MBR to GPT process will run. Once finished, close the window and click Refresh in the Windows installer. The error warning will disappear, and you can continue the installation.
Method 2: Convert MBR to GPT with MBR2GPT (Microsoft’s Recommendation)
Windows 10 Creators Update (1703) and later versions include a built-in command-line tool called MBR2GPT.EXE. This tool is specifically designed for offline conversion with lower risk. Its advantage is that it can be run from a normal Windows environment or from the Windows Preinstallation Environment (WinPE).
- Step 1: Open Command Prompt as Administrator (from a running Windows or from the installation flash drive with Shift+F10).
- Step 2: Validate the disk with the command:
mbr2gpt /validate /disk:0. Replace the number0with your target disk number. - Step 3: If validation is successful, run the conversion command:
mbr2gpt /convert /disk:0. This tool will convert the system partition and adjust the bootloader. - Step 4: After the process completes, you need to change the boot mode in the firmware (BIOS/UEFI) from Legacy/CSM to UEFI Native. Then, the system will boot from the GPT partition.
This MBR2GPT method is the official solution from Microsoft and is often considered more integrated. For more detailed guidance, you can refer to the official Microsoft documentation.
Conclusion
Performing a convert MBR to GPT operation without data loss is entirely possible with the right tools. For users comfortable with advanced commands, GPT fdisk (gdisk) offers detailed control. However, for ease of use and best integration with Windows 10/11, Microsoft’s MBR2GPT utility is the more recommended choice. Always remember to back up your data and ensure your motherboard’s compatibility with UEFI boot mode before starting this partition conversion process.