Are you looking for a second laptop at a low price? Or maybe you’re tempted to advertise a used PC with 16GB of RAM, but it’s half the price of a new one? Be careful! Behind the still-shiny display, there could be hidden hardware problems, a dead battery, or even pirated Windows that could cause you to get blocked by Microsoft.
4 out of 10 buyers of used laptops complained that the performance was slower than expected after 1 month. Cause? They pass the basic test before buying, whereas, with free tools and just 15 minutes, you can tell if it’s worth buying or if it’s a problem.
In this guide, you’ll learn how IT experts inspect used computers, from physical checks to software durability tests. We also leaked price negotiation tricks if red flags are found, such as a problematic hard disk or a 50% battery health. Don’t let your money be wasted on “failed stuff” that has to be fixed in 3 months!
Buy a Used PC/Laptop Without a Test? Get Ready to Regret 7 Derivatives!
Testing a Used PC or Laptop before buying is very important to avoid the various risks that are often hidden behind the cheap price of used devices. Without a thorough check, you could potentially run into issues such as slow performance, hidden damage, or even a bloated battery that could compromise your safety and further damage your device.
Never underestimate inspection before buying, this is your last bastion of:
- “Zombie Device”: A laptop that is slow to apologize, even open the browser for 5 minutes to load!
- Hardware Time Bomb:
- An inflated battery that can explode at any time
- SSD is only 10% of its lifespan (suddenly completely dead tomorrow morning)
- VGA card must be overheated until it is brownish-yellow in color
1. Hardware Inspection: Hardware Inspection Techniques Like Professional Technicians
Before deciding to buy a used Windows PC, it’s important to do a thorough check, both in terms of its physical condition and internal components. This check helps you avoid any hidden damage that could lead to losses down the road.
A. External Check: Don’t Be Deceived by the “Kinclong” Appearance
The physical part of a device often provides an early indication of how the device was used before.
1. Used Laptop “Smell Smell” Test (Seriously, this is important!):
- Smell of burnt/sulfur? It’s a sign of chronic overheating or burning components
- Smell cigarette smoke? Nicotine residue can damage the circuit in 1 year!
2. Test the “Durability” of the Device:
- Hinge Test: Quick open-close of the screen 10x → If it makes a “creak” sound, it means the hinge is severely worn
- Keyboard Torture Test: Press all the keys in Notepad → look for ghost typing
- USB Stress Test Port: Plug the flash drive into all ports → shake during data transfer → if the connection drops, the socket is loose
B. Internal Component Test: Uncovering Hidden Secrets
Once the physical condition has been checked, the next step is to ensure that the internal components are still in top condition.
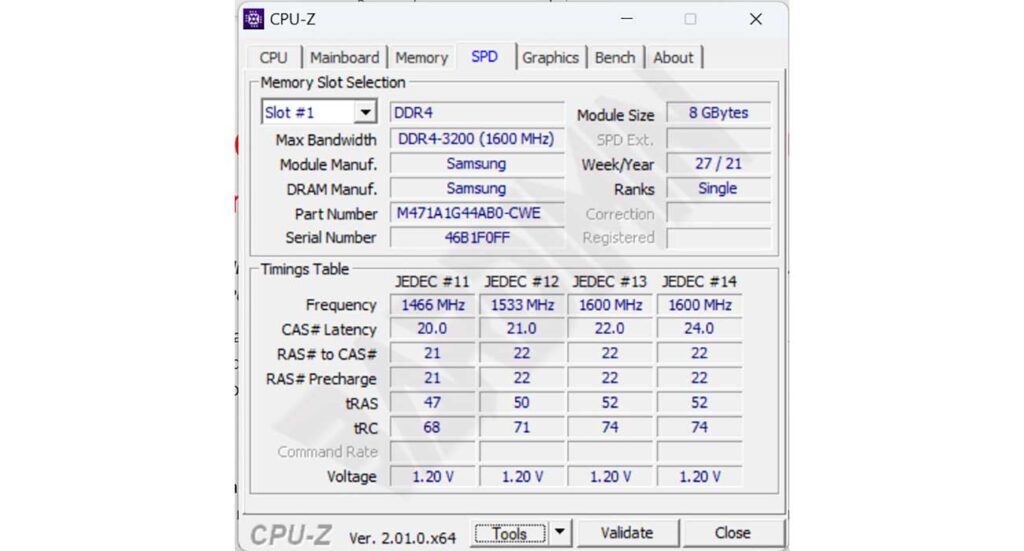
1. CPU-Z – Lie Breaker Specifications:
- Check the real processor speed vs the advertised
- Fake RAM detection (pay attention to vendor & timing)
- Check motherboard model and production age
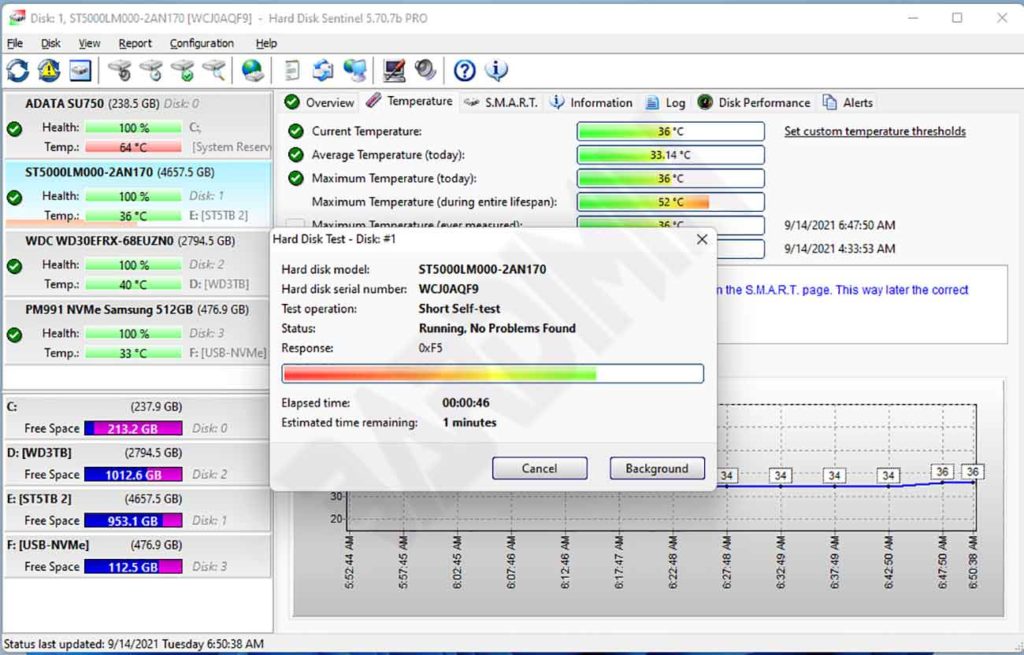
2. Sentinel – Storage Doctor
- Reallocated Sectors Count (if >50, HDD is problematic)
- SSD Wear Level (80% = worn). SSDs with a 95% wear level can shut down at any time.
- Temperature (HDD >50°C = hazard)
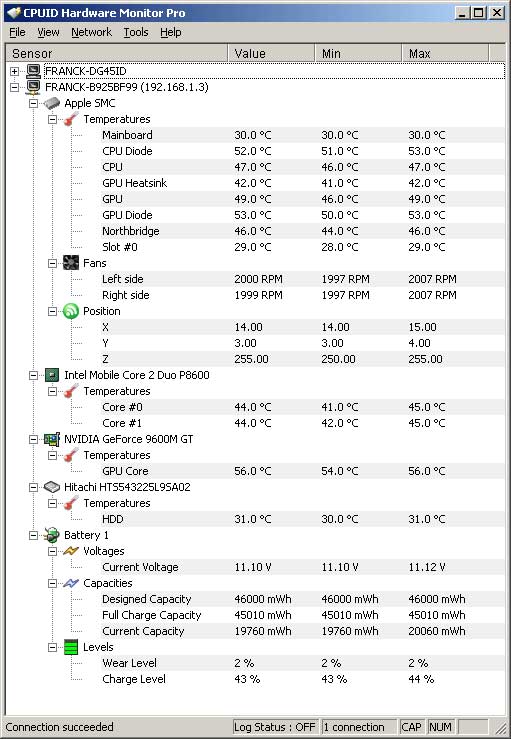
3. HWMonitor – Digital Thermometer:
- Leave idle for 5 minutes → CPU temperature >70°C? Problematic cooling
- GPU temperature increase drastically when opening YouTube? Thermal paste dry
Tips:
Bring a flash drive containing: CPU-Z Portable, Sentinel, HWMonitor, and MemTest86 (for RAM test)
2. Software & Performance Test: Make sure the OS & Application are stable
The stability of the operating system and the performance of the application are important factors that determine the feasibility of a used PC. Although the physical and hardware conditions seem good, problems on the software side can cause various serious problems in the future.
A. Windows Activation & Genuine Check
One of the basic things you need to make sure of is the authenticity of the Windows operating system used. Unofficial versions of Windows have the potential to contain malware, do not receive security updates, and can cause system instability.
How to Check Genuine Windows:
- Click Windows + R to open the Run dialog box
- Type slmgr.vbs /dli and press Enter to view the license information
- Type slmgr.vbs /xpr and press Enter to see the expiration date
- Pay attention to the “Description” and “License Status” sections. If there is a name other than “Windows” or “Microsoft” in the “Description” section, or “License Status” does not show “Licensed”, it could be a sign that Windows is not genuine.
- If an error/warning appears, be careful! You can get blocked by Microsoft at any time!
B. Benchmark Test
Benchmarking is the best method to assess a device’s real-time performance against current market standards.
Gunakan UserBenchmark (Gratis & Cepat)
Install and run UserBenchmark to evaluate CPU, GPU, RAM, and Storage performance. The benchmark results will show whether the device’s performance is still within a reasonable range based on the specifications it should be.
Key Points When Reading the Benchmark Results:
- CPUs and GPUs with far subpar performance indicate possible degradation or damage.
- SSD Read Speed below 200MB/s can be an indication that storage has aged and overall performance is declining.
3. Battery Health Check: Don’t Drop Too Fast!
Battery health is one of the vital factors, especially if you buy a used laptop. Batteries that have significantly decreased in capacity can reduce mobility, comfort, and even require additional costs for replacement.
1. Battery Report (Must Be Done!)
- Open Command Prompt (Admin)
- Type:
powercfg /batteryreport /output “C:\battery_report.html”- Open the battery_report.html file in the browser
Important Parameters:
- Design Capacity indicates the battery capacity when new.
- Full Charge Capacity indicates the current maximum capacity.
If Full Charge Capacity drops below 60% of Design Capacity, then this is a sign that the battery has been degraded quite severely.
4. Final Stress Test: Make Sure It Doesn’t Overheat or Blue Screen
Conducting a stress test before buying a used PC is essential to ensure that the device can operate under heavy loads without experiencing issues such as overheating or blue screens.
This stress test simulates extreme use scenarios that aim to test the stability and durability of the device thoroughly.
A. Preparation of Combat Equipment
1. Download Tools:
2. Important Steps Before Starting:
- Close all other apps
- Place the laptop on a hard surface (not on a mattress/pillow)
- Prepare a cooling pad if you have one
B. Perform a Stress Test Safely (15 Minutes)
1. CPU Torture Test with Prime95:
- Select “Small FFTs” (maximum heat test)
- Let it run for the first 5 minutes
Monitor:
- CPU temperature (ideal <85°C)
- Clock speed (well below base speed? = thermal throttle)
2. GPU Burn Test with FurMark:
- 1280×720 resolution set
- Enable “Burn-in” mode
Beware:
- Artifact (lines/visual impairment) = VGA is broken
- GPU temperature >90°C = danger of overheating
3. Combinations (Optional):
- Run Prime95 + FurMark simultaneously for 5 minutes
- Only high-end gaming laptops can pass this test!
How to Read Test Results
| Problem | Cause | Solution |
| CPU >95°C | Dry thermal paste / broken fan | Request a replacement of thermal paste |
| GPU crash | VGA is problematic | Cancel the purchase! |
| Blue screen | Hardware/DRAM error | Perform memtest86 |
| Throttle | Ugly cooling system | Request a discount |
Physical Check After Test:
- Touch the keyboard part → if it’s too hot to touch = poor cooling
- Smell exhaust air → smell burnt? Overheating components!
Do not purchase if:
- Dying on your own during the test
- Uncontrolled temperature (>100°C)
- Sellers prohibit stress tests
With this 15-minute test, you can avoid regretful purchases and know the true condition of the used laptop!