Das Verständnis von BIOS und UEFI ist grundlegend für die Optimierung von Computersystemen. Dieser Artikel bietet eine tiefgehende Erläuterung der Architekturunterschiede, der Vorteile von UEFI wie Secure Boot und eine vollständige technische Anleitung zur Umstellung von Legacy-BIOS auf UEFI ohne Datenverlust. Entwickelt für Techniker, IT-Professionals und fortgeschrittene Benutzer.
Was sind BIOS und UEFI? Das Verständnis der Firmware-Architektur
BIOS (Basic Input/Output System) und UEFI (Unified Extensible Firmware Interface) sind Firmware, die als kritische Brücke zwischen Computerhardware und Betriebssystem fungieren. Beide werden beim Einschalten des Geräts zuerst in einer Phase ausgeführt, die als Pre-Boot-Umgebung bezeichnet wird. Obwohl ihre Funktionen ähnlich sind, unterscheiden sich ihre Architekturen und Fähigkeiten erheblich.
BIOS ist ein veraltetes System, das in den 1970er Jahren entwickelt wurde. Es befindet sich auf einem ROM- (Read-Only Memory) oder Flash-Speicher-Chip auf dem Mainboard. Das BIOS arbeitet im 16-Bit-Realmode und verwendet den Master Boot Record (MBR) zur Verwaltung von Partitionierungsinformationen. Die Hauptbeschränkungen des BIOS sind eine textbasierte Schnittstelle (POST), eine maximale Speicherunterstützung von 2,2 TB und nur 4 primäre Partitionen.
Im Gegensatz dazu ist UEFI ein moderner Firmware-Standard, der um 2005 eingeführt wurde. UEFI wurde entwickelt, um alle Einschränkungen des BIOS zu überwinden. Es arbeitet im 32- oder 64-Bit-Modus, verwendet das GPT-Partitionierungsschema (GUID Partition Table) und speichert Boot-Daten in Dateien mit der Erweiterung .efi auf einer speziellen Partition, die als EFI-Systempartition (ESP) bezeichnet wird. Der grundlegende Unterschied zwischen BIOS und UEFI liegt in dieser Architektur, die den Weg für erweiterte Funktionen ebnet.
Detaillierte Vergleichstabelle: BIOS vs. UEFI
| Aspekt | BIOS (Legacy) | UEFI (Modern) |
|---|---|---|
| Architektur & Modus | 16-Bit, Realmodus | 32/64-Bit, geschützter Modus |
| Benutzeroberfläche | Text (POST), Tastaturnavigation | Grafisch (GUI), Maus- & Touch-Unterstützung |
| Partitionstabelle | MBR (Master Boot Record) | GPT (GUID Partition Table) |
| Partitionsgrenzen | 4 primäre Partitionen, max. 2,2 TB pro Festplatte | 128 Partitionen unter Windows, bis zu 9,4 ZB |
| Boot-Zeit | Relativ langsamer | Schneller mit Fast-Boot-Technologie |
| Sicherheit | Minimal, anfällig für Bootkits | Secure Boot, Code-Signaturvalidierung |
| Netzwerkunterstützung | Keine | Vorhanden (PXE, Remote-Firmware-Update) |
| Diagnosefähigkeiten | Eingeschränkt | Umfangreich mit integrierten Tools |
Analyse der UEFI-Vorteile: Mehr als nur ein BIOS-Ersatz
UEFI kam nicht nur als Ersatz, sondern als Firmware-Revolution. Hier ist eine tiefgehende Analyse seiner Vorteile:
- Secure Boot und Systemintegrität: Die Funktion Secure Boot ist eine Sicherheitssäule von UEFI. Sie stellt sicher, dass nur Betriebssysteme und Treiber mit vertrauenswürdigen digitalen Signaturen während des Bootvorgangs geladen werden. Dies verhindert effektiv Rootkits und Bootkits, die die Firmware-Ebene angreifen. Quelle: Microsoft.
- Skalierbarkeit und zukünftige Kompatibilität: Mit GPT-Unterstützung beseitigt UEFI Speicherplatzkapazitätsbeschränkungen. Darüber hinaus ermöglicht die modulare Architektur von UEFI die Entwicklung von Treibern und Firmware-Anwendungen (UEFI-Apps), die unabhängig vom Betriebssystem sind.
- Bessere Verwaltung und Wartung: UEFI bietet eine umfangreiche Setup-Oberfläche und einfachere Firmware-Updates über das Betriebssystem. Einige Implementierungen verfügen sogar über Remote-Management-Fähigkeiten für IT-Administratoren.
- Zwingende Voraussetzung für neueste Technologien: Windows 11 erfordert offiziell ein System mit UEFI-Firmware und aktiviertem Secure Boot. Ebenso erfordern moderne Speichertechnologien wie Festplatten >2,2 TB und bestimmte Hardware-RAID-Konfigurationen UEFI.
So überprüfen Sie den Boot-Modus in Windows: Diagnoseschritte
Überprüfen Sie vor einer Konvertierung den Status Ihres Systems. Hier sind zwei Hauptmethoden:
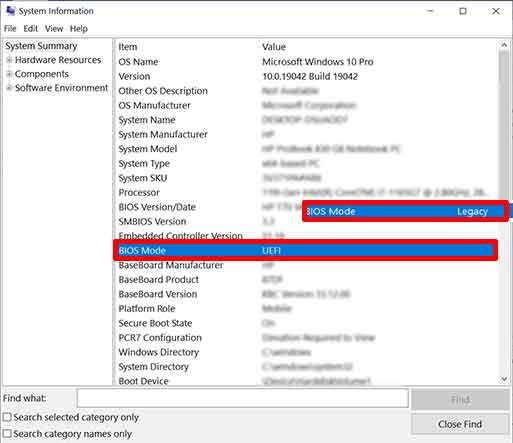
Methode 1: Verwenden der Systeminformationen (msinfo32)
Diese Methode liefert die genauesten Informationen. Drücken Sie Win + R, geben Sie msinfo32 ein und drücken Sie die Eingabetaste. Suchen Sie nach der Zeile „BIOS-Modus“. Der Wert UEFI oder Legacy wird angezeigt. Diese Information ist entscheidend für die Entscheidung über die nächsten Schritte.
Methode 2: Über die Datenträgerverwaltung
Öffnen Sie die Datenträgerverwaltung (Rechtsklick auf das Startmenü). Sehen Sie sich Ihre Systemfestplatte an. Wenn es eine Partition namens „EFI-Systempartition“ gibt (kleine Größe, typischerweise 100-500 MB), dann läuft das System im UEFI-Modus. Wenn nicht und Sie eine „System-reservierte“ Partition sehen, verwenden Sie wahrscheinlich Legacy-BIOS mit MBR.
Anleitung zur Umstellung von Legacy-BIOS auf UEFI ohne Datenverlust
Der Konvertierungsprozess umfasst zwei wichtige Änderungen: Ändern des Partitionsschemas von MBR in GPT und Ändern der Firmware-Einstellungen. Windows 10 (ab v1703) und Windows 11 bieten das integrierte Tool mbr2gpt.exe. Führen Sie eine Sicherung wichtiger Daten durch, bevor Sie beginnen.
Phase 1: Validierung und Konvertierung von Partitionen mit MBR2GPT
- Öffnen Sie die Eingabeaufforderung oder PowerShell als Administrator.
- Validieren Sie die Festplatte zunächst mit dem Befehl:
mbr2gpt /validate /disk:0 /allowFullOS
Der Parameter/disk:0zeigt auf die Systemfestplatte. Ändern Sie die Zahl bei Bedarf. - Wenn die Validierung erfolgreich ist (Validation completed successfully), führen Sie den Konvertierungsbefehl aus:
mbr2gpt /convert /disk:0 /allowFullOS
Dieser Prozess erstellt eine neue EFI-Partition (ESP) und konvertiert MBR in GPT, ohne die Daten zu beeinträchtigen.

Phase 2: Konfigurieren der Firmware für den UEFI-Modus
- Starten Sie den Computer neu und rufen Sie das Firmware-Setup auf (drücken Sie während des Bootvorgangs Del, F2, F10 oder Esc).
- Suchen Sie nach einer Einstellung namens „Boot-Modus“, „UEFI/Legacy-Boot“ oder ähnlich. Ändern Sie diese Option von „Legacy“ oder „CSM“ in „Nur UEFI“.
- Deaktivieren Sie das Compatibility Support Module (CSM), falls vorhanden. Dieser Schritt ist entscheidend, um Secure Boot vollständig zu aktivieren.
- Speichern Sie die Änderungen und beenden Sie das Setup. Das System wird neu gestartet.
Nach der Konfiguration wird Windows über den UEFI-Pfad starten. Überprüfen Sie erneut in den Systeminformationen. Sie haben jetzt erfolgreich von BIOS auf UEFI umgestellt und können Funktionen wie Secure Boot aus dem Firmware-Setup aktivieren.
Fazit und praktische Empfehlungen
Die Migration von BIOS zu UEFI ist ein sehr empfehlenswerter Systemupgrade-Schritt. Die Vorteile umfassen erhöhte Sicherheit, Kompatibilität mit neuer Hardware und eine bessere Boot-Leistung. Für Profis und Techniker ist das Verständnis des Unterschieds zwischen BIOS und UEFI und die Beherrschung des Konvertierungsprozesses eine wesentliche Fähigkeit. Konsultieren Sie stets die offizielle Dokumentation des Mainboards und des Betriebssystems für die genauesten Anweisungen.